The landing page is also named as lead capture page and it serves as, like the homepage of a website, it is one of the most essential and vital parts of marketing automation suite. Through landing pages, you can generate quite a centralized lead capturing marketing campaigns and operate the landing pages link through online advertisements on Facebook ad campaigns and Google AdWords. Inside the landing pages, you can add social media signup buttons and then take them to the next level and comforts the ability to capture much more leads using social media traffic in less time.
Uses and purpose of Landing pages-
- Landing pages are used for lead generation.
- Landing pages are usually connected to e-mail campaigns, social media, or search engine marketing campaigns in order to lift the effectiveness of the advertisements.
A landing page is incomplete without a lead capturing form. Inside Aritic PinPoint, various styles of forms can be created.
Landing pages and forms
Forms on a landing page are used to capture leads. We recommend using progressive profiling on your forms in order to capture more lead information gradually.
You can create a simple Captcha inside your forms, customize the submit button, and save referrer URL automatically from the form. [We suggest you opt for landing page tracking script, which we will discuss later in this article].
To embed a form on your landing page, you must first have the form ready inside Aritic PinPoint. Once your form is ready and saved, you can then start building your landing page.
[lore_alert_message type=”info”]
You can build the form later as well. We are not stating this as a mandate. Creating a form prior to building a landing page helps you quickly launch your landing page once completed.
Also note, not all landing pages require a form. You can also use social subscribe buttons (discussed below) or include a pop-up form when a visitor clicks on the submit/subscribe button on your landing page.
[/lore_alert_message]
Steps to build a form:
Login to your Aritic PinPoint dashboard, and click on Forms under Assets, and click on Design New Form on the top right corner.

Select the type of form you want to build. Inside Aritic PinPoint, we have two types of forms:
- Standalone forms
- Campaign forms
In this case, we will build a campaign form. The Campaign Form builder page looks like this:
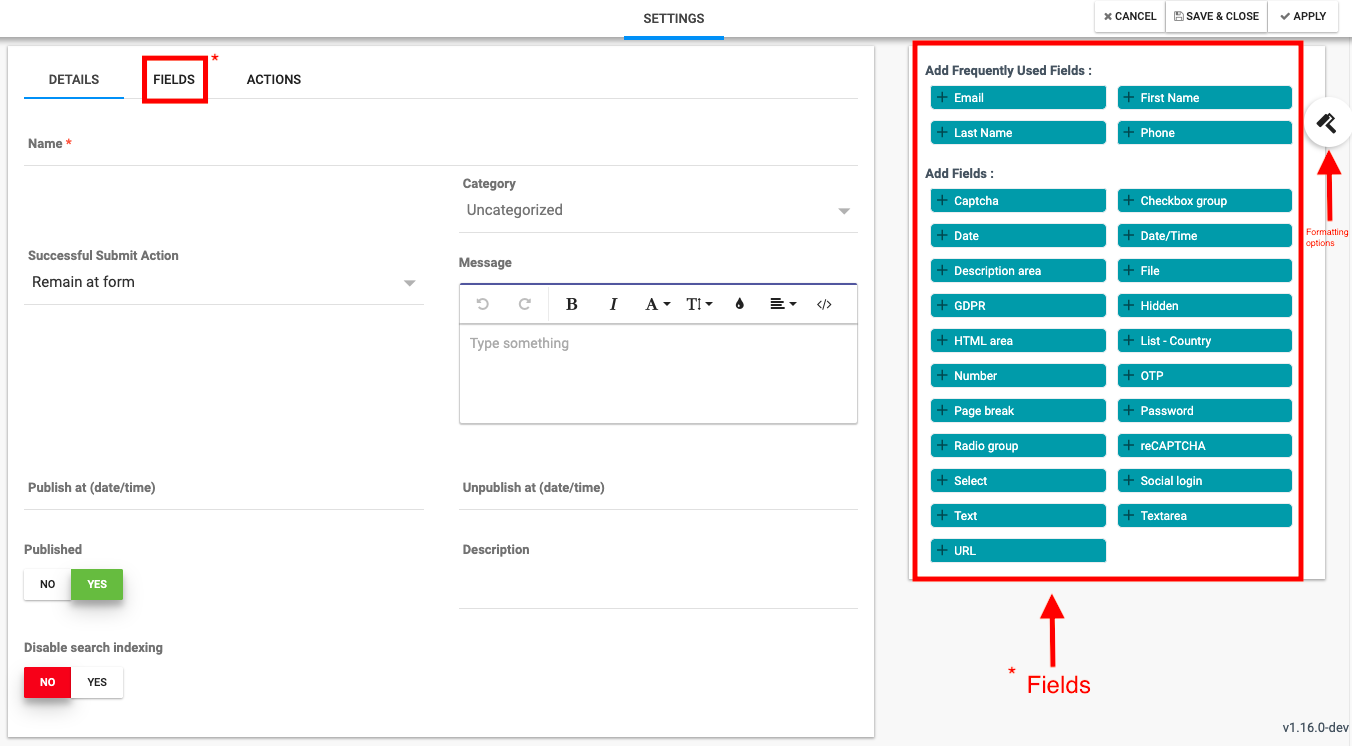
You need to enter form details and add requisite fields that you want to show on your form. Beside the form fields, you will see a paint-brush-like icon. This is where all the formatting options appear. On clicking this icon, you will see the following options:
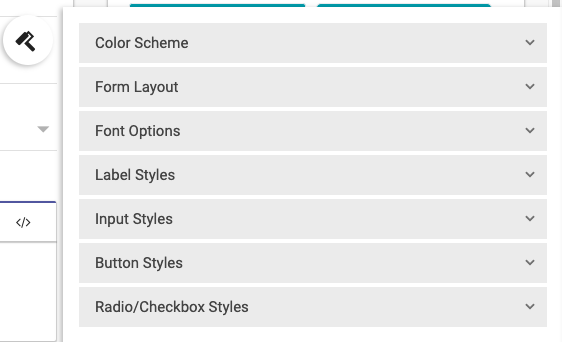
- Color Scheme: Lets you choose a form background color.
- Form Layout: Lets you set up form width, alignment, padding, corner styles, and form border details.
- Font Options: Lets you pick a font for your forms.
- Label Styles: Lets you set up the label styles.
- Input Styles: Lets you set up the input style, width, height, and corner styles.
- Button Styles: Lets you customize the form submit button.
- Radio/Checkbox Styles: Lets you decide how your checkboxes will look like on your form, i.e. like lists or inline.
You will notice, the form builder has three tabs – Details, Fields, and Actions. You know what the first two are. The Actions tab lets you decide the follow-up action right after a visitor submits a form. You can select any one of the actions listed inside Aritic PinPoint by default.

[lore_alert_message type=”alert”]
Note: You may sometimes not see a particular field available for use on your form. This may happen because that field is turned off for your forms. You can go to custom fields and turn the field option for your forms. Incase a particular field you’d like to use does not exist in your database, you can simply create it using Custom Fields option. Follow the guide to know what custom fields are and how to create them.
[/lore_alert_message]
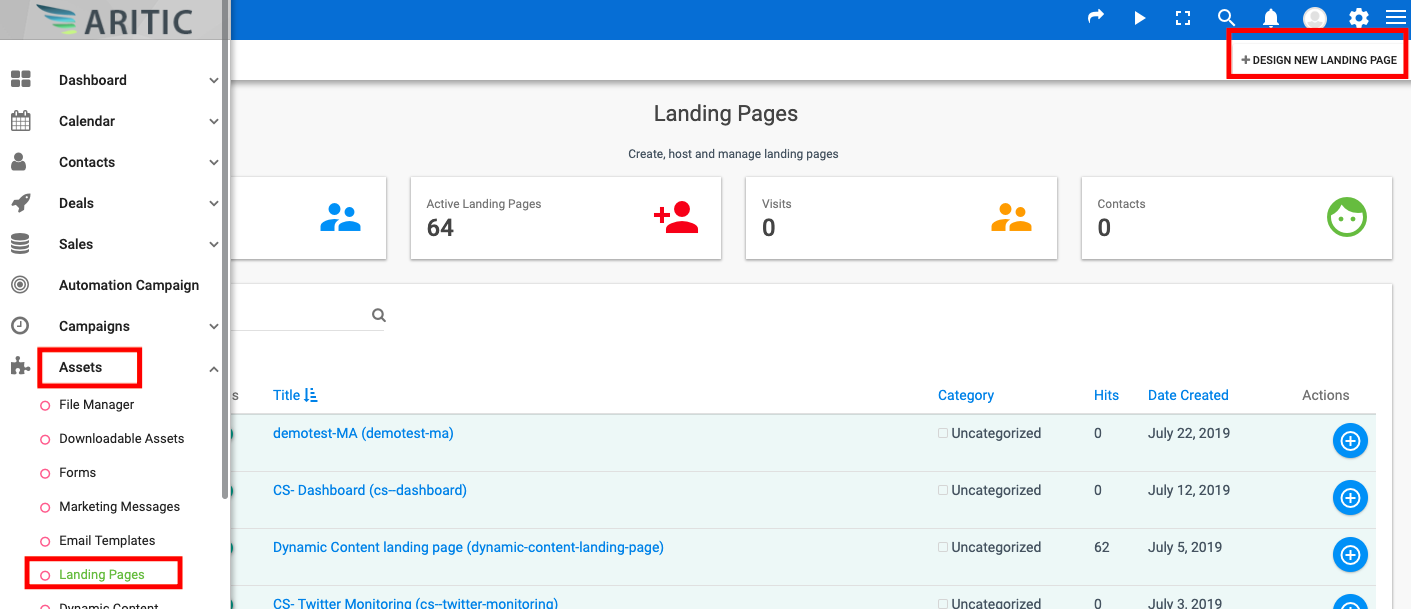
Now that your form is ready, you can now start building your landing page. You will find the Landing Pages under Assets on your Aritic PinPoint dashboard.
Getting Started with Landing Pages inside Aritic PinPoint
You can pick a landing page template from our template library. All the templates are customizable and responsive. You can also use a blank template and build your landing page from scratch, or use the coding mode to copy and paste the HTML code of your pre-designed landing page. For our demonstration purposes, we will use the blank template here.
To build a landing page, log in to your Aritic PinPoint dashboard. Go to Assets > Landing Pages > Design New Landing Page.
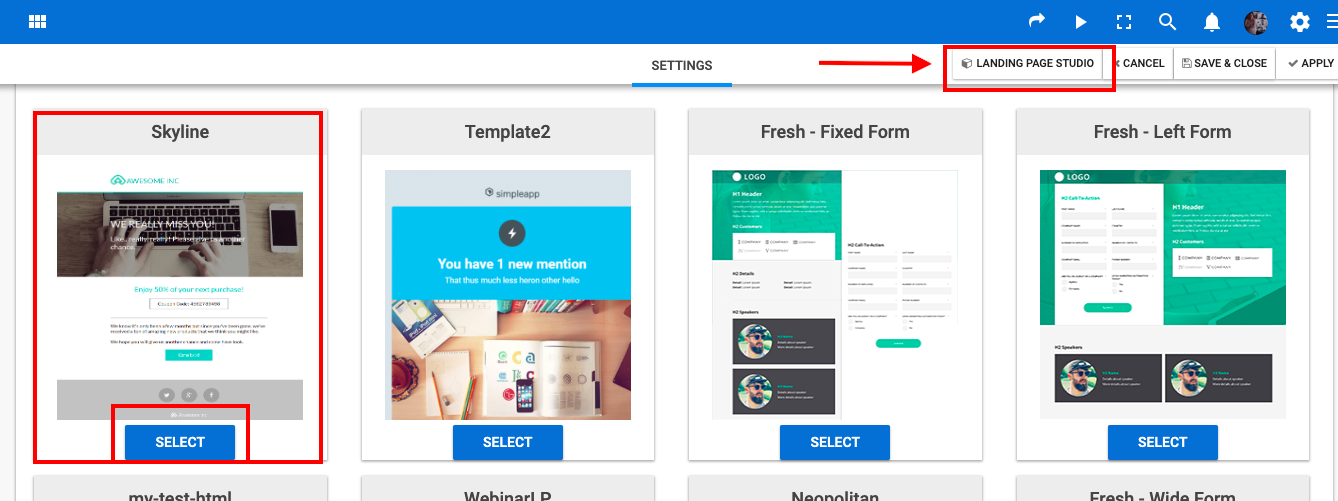
On the New Landing Page builder, you will need to pick a template first. As mentioned, we will use the Skyline template for the demonstration. The templates are available under the Themes tab. Once you’ve selected the theme, click on Landing Page Studio to start building your landing page.
[lore_alert_message type=”info”]
The process is the same for any theme you select. Simply select the theme and click on Landing Page Studio to customize or build the landing page.
[/lore_alert_message]
The landing page studio has options to add various elements. The builder is an easy-to-use drag-and-drop builder where you can just drag an element to the spot where you want to add it.

The landing page builder lets you select the type of content you want to add. You can add only a text block, only an image block, an image card block, an image-caption block, a call-to-action button, a social share button, a social follow option, a content separator, and a video.
The code mode lets you add an HTML content block to your template. Once you drag and drop the code mode element, you can paste your HTML code to display on your template.
There is another option inside the landing page builder: Dynamic Content.
Dynamic content is also called as Conditioned Content, where you add a set of conditions which when fulfilled, a separate version of content is displayed. For instance, you are building a landing page for an event and you are giving away an early bird discount upon reservation within a particular time period. Visitors who are seeing this landing page for the first time will see content like ‘Exclusive early bird discount for you! Get your seats reserved at 50% lesser price’. However, those who are visiting this same landing page again after reserving their spot, will not like to see the earlier message, because they have already done that. For these visitors, you can have content like “Your seat is reserved. See you on the 3rd. Meanwhile, check out our agenda for the event”. This content will be displayed only when a visitor meets the condition “has made a purchase”. This is called Dynamic Content.
You can learn about Dynamic Content in details in Using Dynamic Content guide. In this guide, you will also find all the details of using conditions and actions and setting up dynamic content on landing pages.
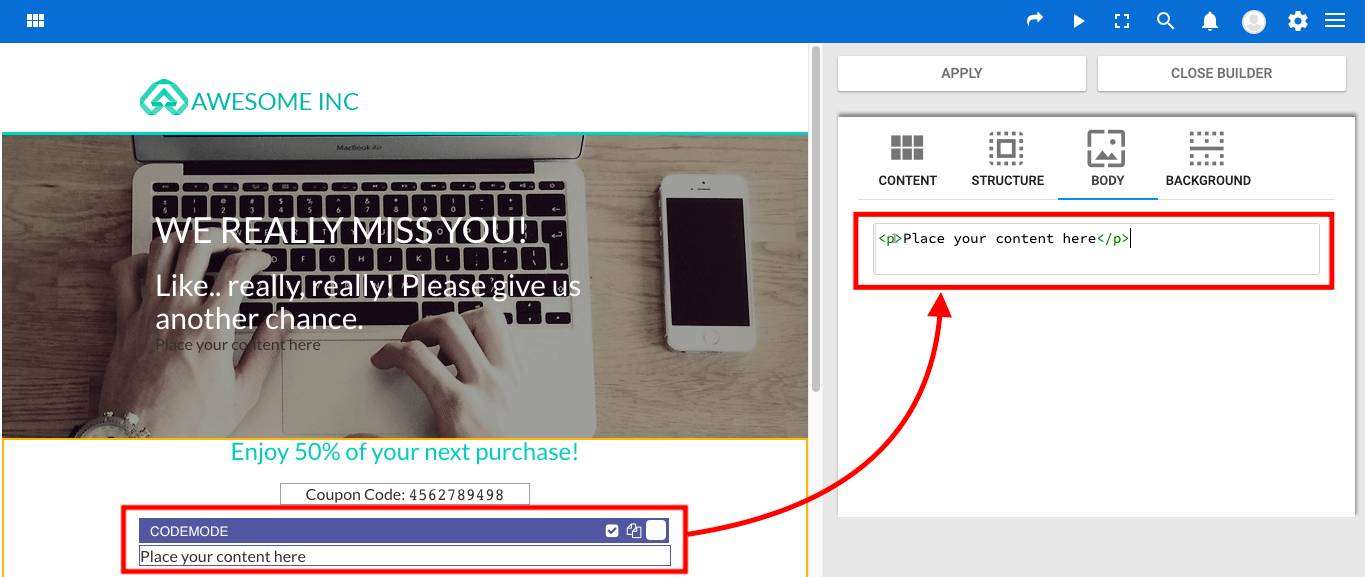
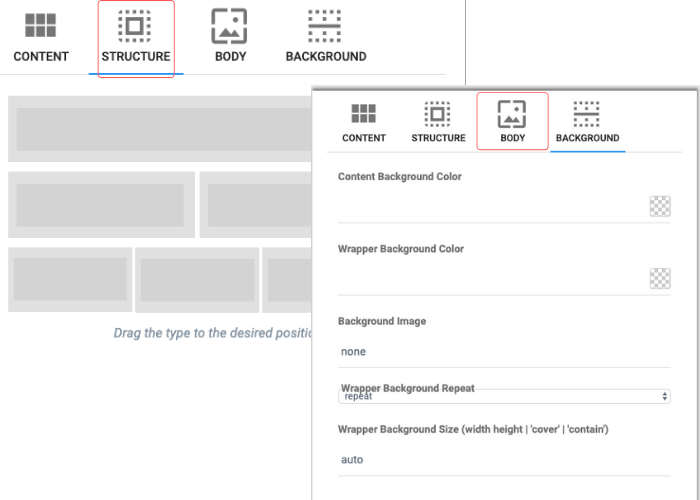
Once you have finished adding all the content elements on your template, you can modify the structure and layout from the Structure option. The Body tab helps in inserting all the content and images and editing them. Last is the Background option. As the name suggests, you can edit and set the background of your landing page template.
Here you can enter the form that you created.
In the builder, drag and drop a text block > Insert token > choose the form you want to add. The form will be displayed with the token {form ID} after adding.

After finishing all the editing and designing, click on Save and Apply to save all the changes. Now click on Close Builder to go back to the landing page builder page.
[lore_alert_message type=”info”]
Make sure you click on Save and Apply first rather than Close Builder.
[/lore_alert_message]
You have set up your landing page theme. Now, we will set up the General details of your landing page.
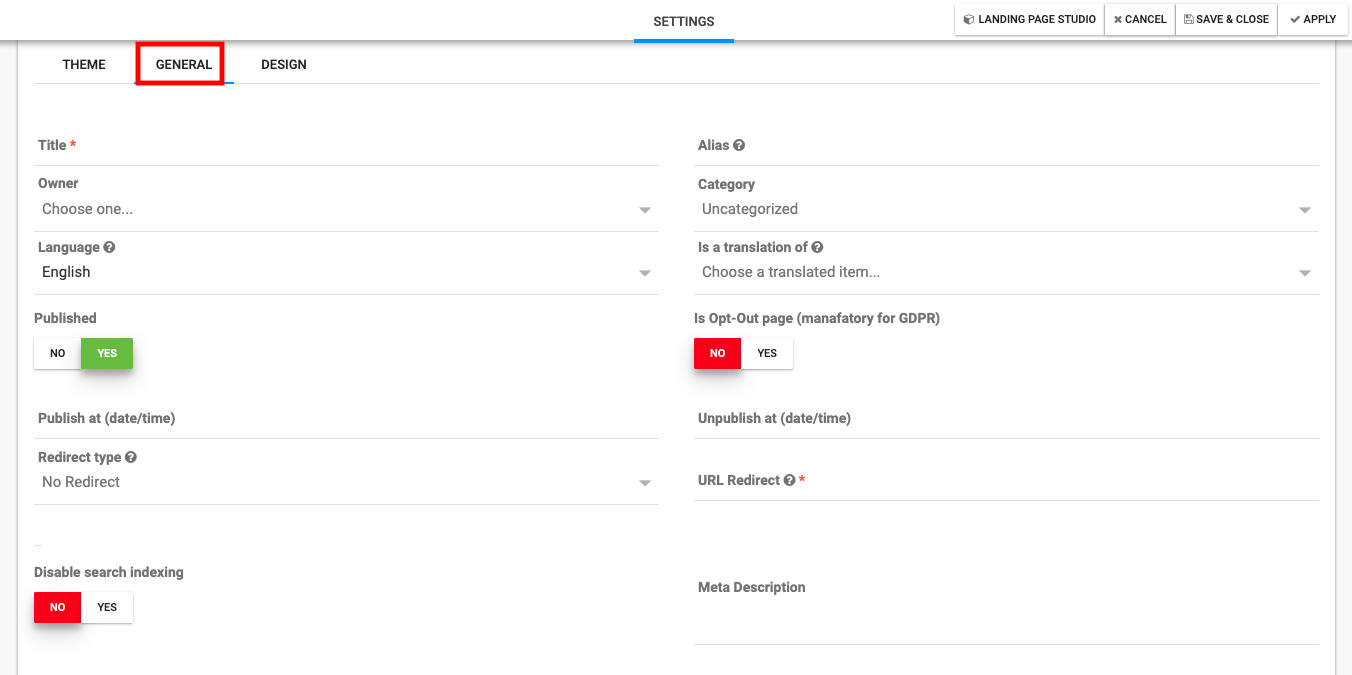
Here you need to fill in the:
- Title: Title of your landing page.
- Alias name: Alpha-numeric string used for URL generation.
- Owner: It can be you or anyone in your team. This indicates who is building the landing page and mostly required for internal purposes.
- Category: Category indicates the purpose of the landing page – it can be for webinars, for asset downloads, etc. Know more about building landing page categories here.
- Language: Aritic PinPoint supports multiple languages. By default, it is set to English. You can change it if you are building a landing page for an audience segment familiar with another global language.
- Is a translation of: Inside Aritic PinPoint, you can create translations of your landing page. If the current landing page is a translation of another existing landing page, then choose that landing page from the drop-down arrow. Know more about building translated landing pages here.
- Published: This indicates the status of your landing page. By default, it is set to YES. You can turn it off if you don’t want to make your landing page live as of yet.
- Is Opt-out Page: This is mandatory if you are creating a landing page for a European audience or you are in Europe. We recommend turning it on even if otherwise.
- Publish at: If you turn this on, the Publish option on the top will automatically get disabled. Here you can schedule your landing page to publish on a particular date.
- Unpublish at: This lets you decide until when your landing page will remain published.
- Redirect type: You can create a redirect type like 301 permanent or 302 temporary if required.
- URL redirect: If you are creating a redirect type, you must enter a redirect URL where your visitors will be redirected.
- Disable search indexing: If turned off, this stops search engines from indexing your landing page.
- Meta description: This is important if you want search engines to index your landing page. It is a short description that is shown on the search engines.
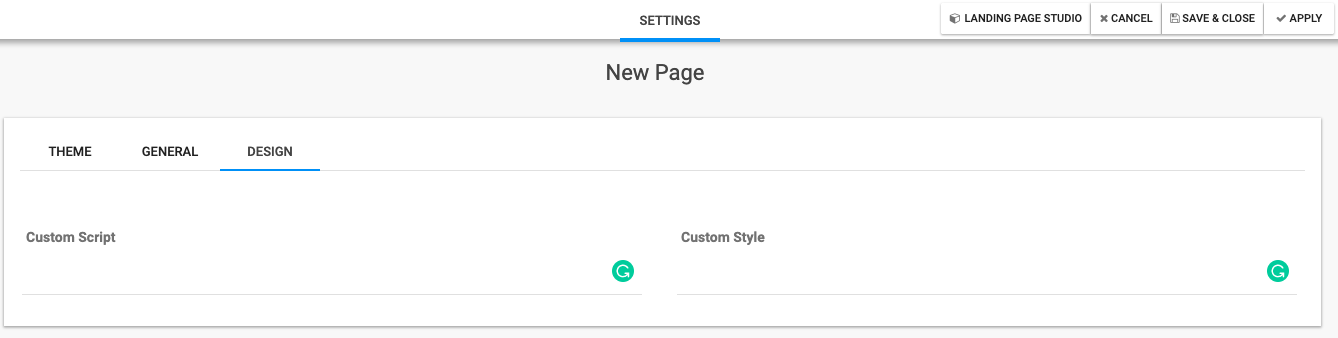
After setting up all the general settings, click on Apply, and then go to the next tab – Design. Design has two options: Custom script and Custom Style. Input the requisite script and style code if required.
Click on Apply, then click on Save and Close to save all the changes. Your landing page is now ready for use.
Building landing page using HTML code
Code mode is used to create customized landing pages based on how you want to define your page layout for your visitors. It is an HTML code and is used to define page layout, images, bullets points, numbered lists, and brand logo. All landing page elements should be featured with appropriate HTML tags to define the webpage.
- You can create your own style of Page Layout.
- You can choose the images to place on your landing page.
- You can add your logo.
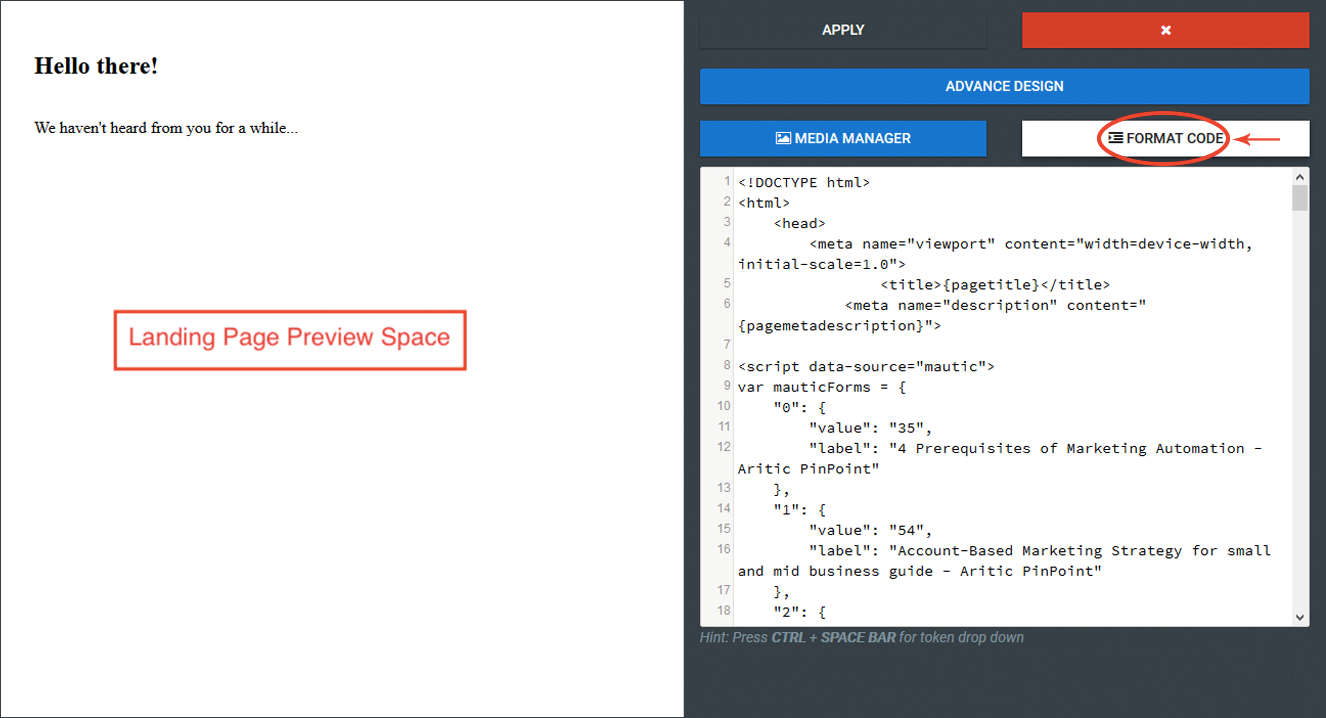
Inside Aritic PinPoint, you will find a Code Mode theme. This theme lets you code your own landing page or just paste the HTML code in the builder. A basic outline is done in this theme. You need to click on the Format Code option to start customizing it. You can customize your HTML code directly inside the builder if needed. On the left hand, you will see a preview of how your landing page looks and on the right side, you will have the code editor.
Know how to build a landing page using the code mode.
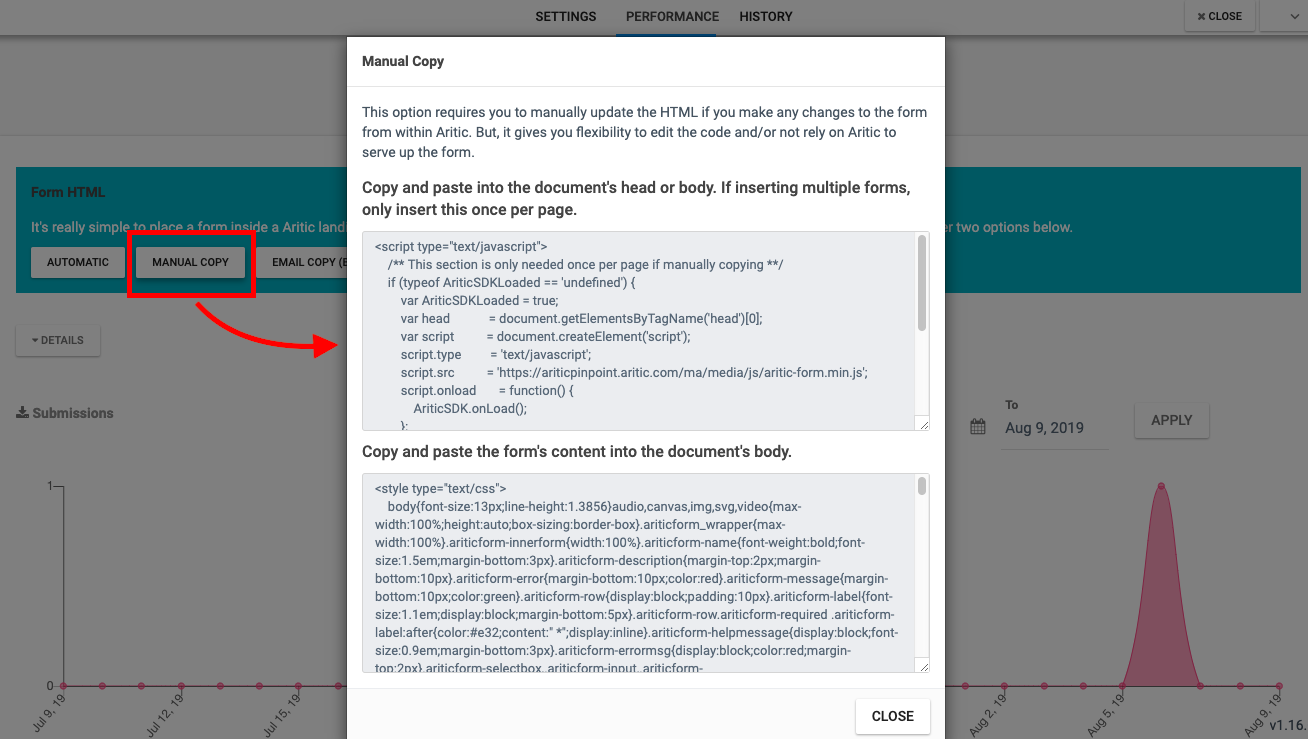
In code mode also, you can integrate forms. Here’s how:
Open the form you want to integrate inside your landing page from your Forms Page. Now, click on Manual Copy to reveal the HTML code. Copy this code and paste it in your landing page code wherever you want to put the form.
Personalize your landing page with Videos and Social Media Elements
- Using Gated Videos on your landing pages
- Embedding Wistia Video in your landing pages
- Using social media elements in your landing pages
Landing Page Tracking and Monitoring
Just building a landing page is not enough. You need to track and monitor your landing page performance. To track your landing pages, you must use the tracking script available inside Aritic PinPoint.
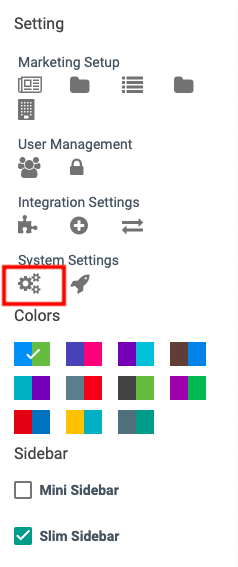
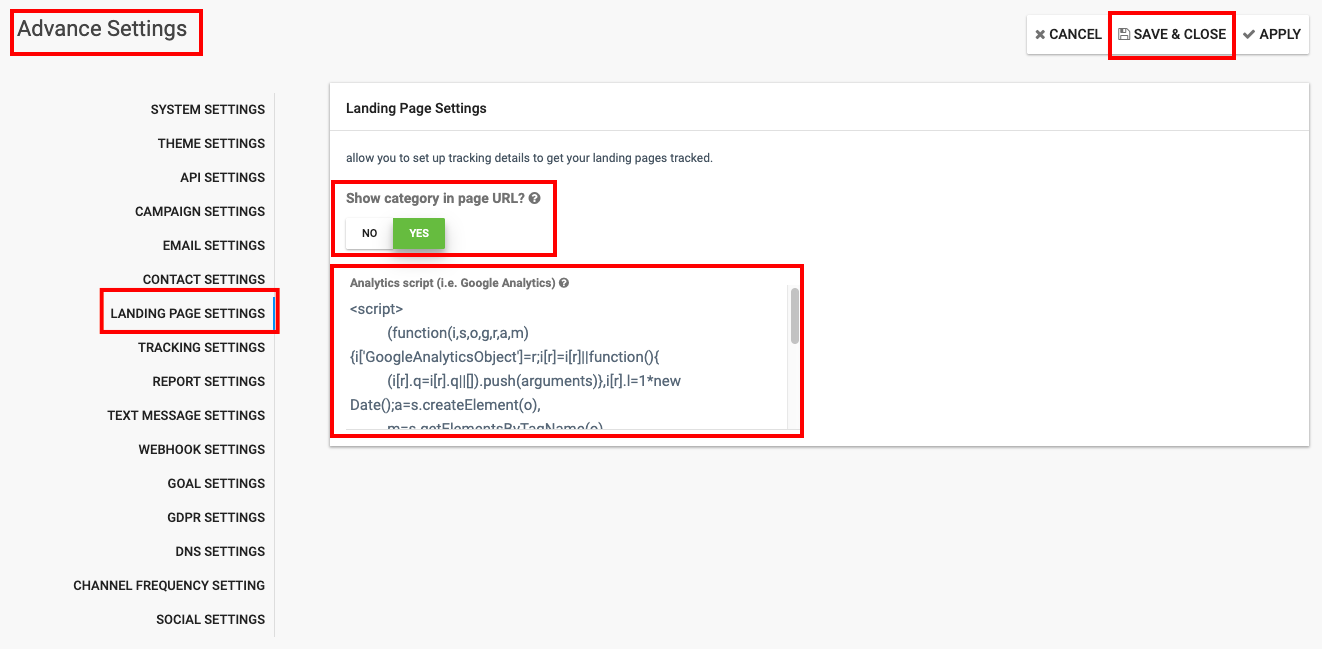
Select the Settings option. Under System Settings, you will find Advanced Settings. On the Advanced Settings page, scroll down to Landing Page Settings.
Here you will find the tracking script that you can copy and paste in the HTML section under the <body> tag while building your landing page.
You can turn on the Show category in the page URL to show the slug URL in your tracking report. Once done, click on Save and Close to save and apply all your changes.
Another method is to enable Facebook custom audience tracking and Google ad audience tracking on your landing pages.
Under Advanced Settings, you will find another option: Tracking Settings. On this page, you can:
![]()
- Identify visitors by tracking URL: Identity returning visitors by tracking URLs from channels.
- Identify visitor by device fingerprint: Identify returning visitors when no cookies are set.
- Anonymize IP: The visitor’s IP will be both displayed and saved as 192.168.0.****
Here you can turn on Facebook Pixel tracking on your landing pages built inside Aritic PinPoint. This tracking helps in tracking and syncing Facebook’s custom ad audience. When turned on, this setting is applicable by default on any landing page you build.
![]()
Similarly, turn on Google Analytics tracking settings for you to set up Google ad audience tracking and sync. When turned on, this setting is applicable by default on any landing page you build.
![]()
[lore_alert_message type=”info”]
Sometimes you may need to anonymize the IP address of the hit sent to Google Analytics. In such cases, turn on Anonymise IP option
[/lore_alert_message]
Once done, click on Save and Close to save and apply all your changes.
Monitoring landing page performances with A/B testing
Your landing page may fail for various reasons. However, you can work around these errors and fix them on a priority basis. One way to avoid landing page mishaps is to test your landing page. A/B testing your landing page helps in identifying the winning version of your landing page. This A/B test is done using the original version [control] against multiple versions [variants]. It is sent to the contacts on a 50:50 ratio – where one half receives the control and the other variant. This helps in checking which version performs better.
[lore_alert_message type=”info”]
Beware of these 15 A/B testing errors while testing your landing pages.
[/lore_alert_message]
To do an A/B test, go to Assets > Landing Page > Click open the landing page you want to test. Go to the top right corner and click on the drop-down arrow. You will find the option: A/B test. Click on it.
Alternatively, you will see Create an A/B test option displayed right below the performance chart.
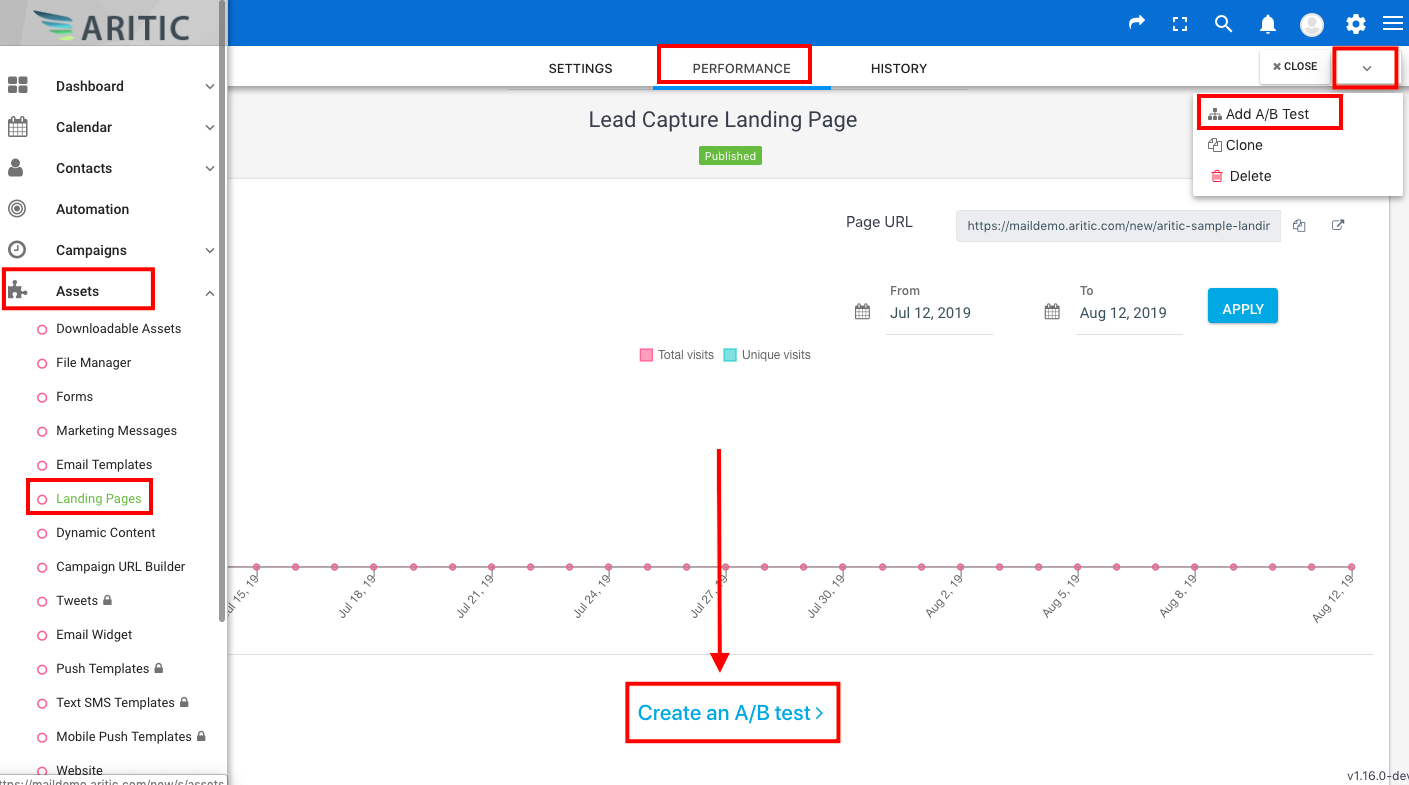
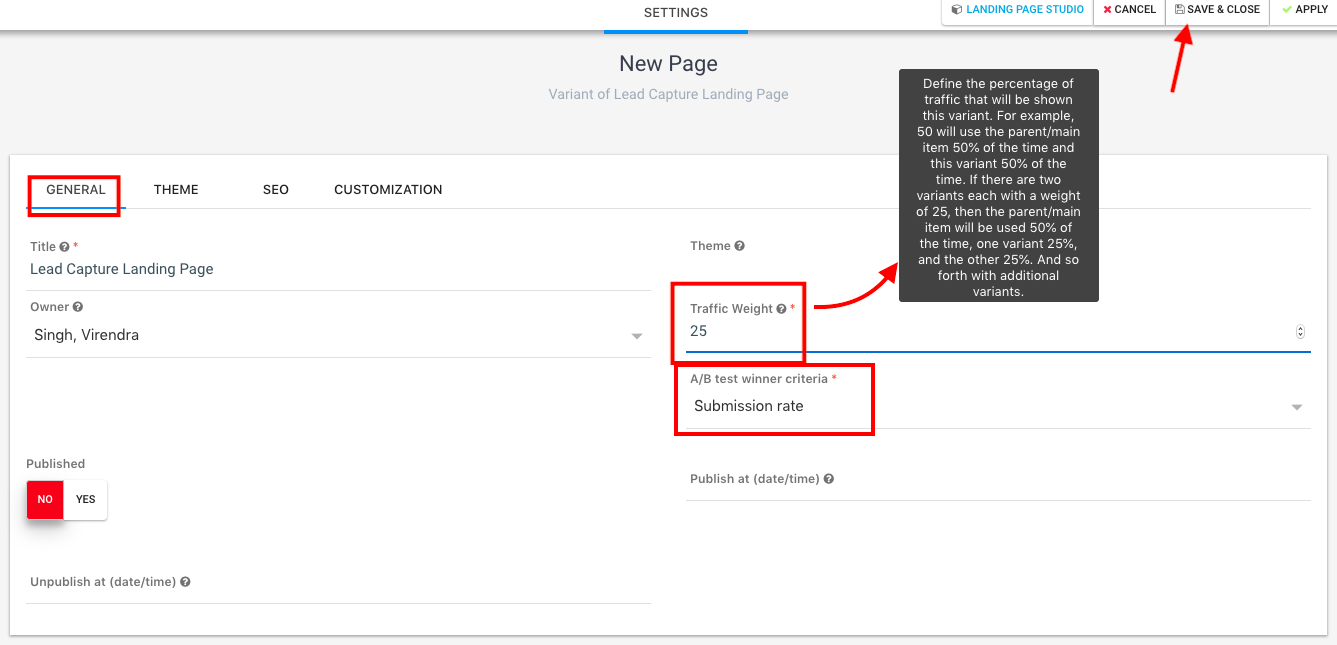
Make sure the landing page name, the theme remains the same. In this page, fill in the A/B test criteria. Here we have used the Submission rate.
After both your variations are live and sent out to your traffic (50/50), you will see the performance metrics under the Performance tab when you open the landing page sheet.

You will see the A/B test stats under the performance graph. Once the variants are all created, you will see that the parent page, as well as the variant(s), have the same URL. Though the URLs are the same, contacts will land on the parent page or variants according to traffic weight percentage.
You are now ready to get started with landing pages inside Aritic PinPoint. Good luck.