In this article, you’ll learn how to move your lists and contacts from your Mailchimp account to Aritic PinPoint contacts and segments, this migration must be taken care so that you do not lose any subscriber data. Further, compared with basics, Aritic PinPoint is contact-centric platform where contacts are added first into the platform and based on segment filters, segments are added and used accordingly. Whereas, MailChimp is based on List-Contact-Segment based application.
Here are the important steps you must follow before beginning this process:
- To complete this process, you’ll need to have prepare your custom fields in Aritic PinPoint.
- Next process involves two major tasks: exporting Mailchimp subscriber list
- Importing the list into Aritic PinPoint.
Moving a subscriber completely have a risk of losing that subscriber’s activity and other information. But this process will help you move the list from Mailchimp to Aritic PinPoint without losing those information at the same time.
Step 1: Add Custom Fields inside Aritic PinPoint, follow these steps:
1. If you have set up any custom fields in Mailchimp, you will be required to add those same custom fields in Aritic PinPoint first.
Click on the lists name in Mailchimp to check for custom fields. Click on the “Settings” menu and then select the “list fields” and “Merge” tags. If you are thinking about the primary address, first and last name, company, then don’t worry as these details are already present in Aritic PinPoint.
For instance, if you own a shop, then you may get an option to enter the kind of customer, the subscriber is- “write the type of examples” “include sc.”
2. Add (existing from MailChimp) Custom Fields to Aritic PinPoint
In order to add the custom fields, click on the settings icon in the top right and select “Custom Fields” from Marketing Setup tab. Now, you can view all the fields which are already set up in your Aritic PinPoint dashboard.
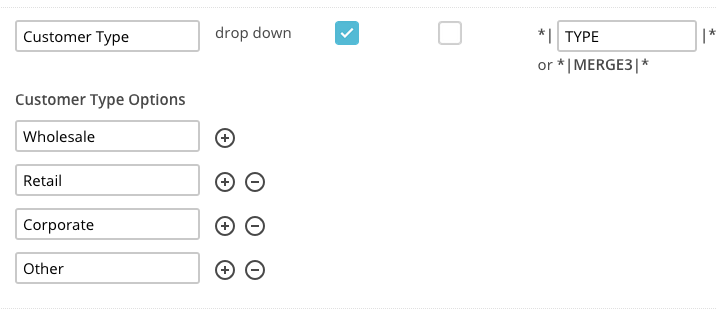
Select the “+New” button present in the top right to create your new custom field. As shown in this example, I’m creating a “Customer Type” as a “Select” field and set up the options so that to match my old custom field (similar to MailChimp).

You can follow this detailed guide too, about adding custom fields inside Aritic PinPoint.
Step 2: Export of subscribers from Mailchimp and importing them into Aritic PinPoint
Click on the name of the list you want to export from the “Lists” page in Mailchimp. Click on the “Export” button to export your file.

Mailchimp allows to access a new page where it can load your export in a hassle-free manner. To download your list, click on the “Export” button.
MailChimp will give the zip file; you need to Extract the zip file to get the csv file; this csv file will be uploaded inside Aritic PinPoint.
Step 3: Import the contact list into Aritic PinPoint
1.It’s the right time to get your MailChimp subscribers into Aritic PinPoint when you have your CSV export file ready from Mailchimp.
Now navigate to “Contacts” page in your Aritic PinPoint dashboard.

Select the “Import Contacts” option, near to the top right corner of the page.
You just need to click on the “Upload” option after you select your CSV file to import.

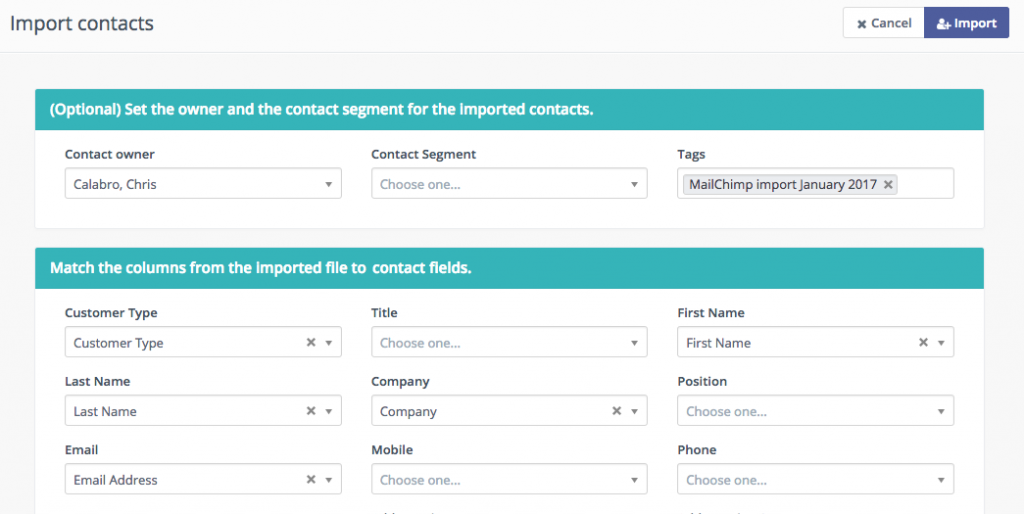
2. Map out your Contact fields and assign a tag to your import
Now, you can view all of Aritic PinPoint’s contact fields. Map the actual fields you want to import. Beginning from the first step I can include an email address, first name, last name, company which I created earlier. Assign yourself as the “some profession” and create a new tag for these contacts.
3. Importing Contacts
Since now you have mapped your contact fields, click on the “Import” button in the top right. After this step ends, Aritic PinPoint will start importing process for your list.

Now you can see a status window displaying the progress of your import. This process may require period of a few seconds to even many minutes depending upon the size of your list.
4. Success Message
You will be able to view this success message, once the task of importing is done.

If your tasks of importing fail, Aritic PinPoint will explain the reason also.
PS: You need to repeat these same steps to move the unsubscribe and bounces from the MailChimp account to Aritic PinPoint. You can view cleaned added in your list by following this article.
Conclusion:
Reach to our customer success team, if you find any difficulty in moving the lists and contacts from Mailchimp to Aritic PinPoint.