Mailchimp is an email marketing service provider whereas Aritic PinPoint is full stack marketing automation platform for digital business.
In this article, you’ll learn how to move your lists and contacts from your Mailchimp account to Aritic PinPoint contacts and segments automatically, theough Mailchimp integration, so that you donot lose any subscriber data.
Further, compared to basics, Aritic PinPoint is contact-centric platform where contacts are added first into the platform and based on segment filters, segments are added and used accordingly. Whereas, MailChimp is based on List-Contact-Segment based application.
Using this MailChimp integration with Aritic PinPoint, you would be able to:
- Sync Contacts from a Aritic PinPoint to MailChimp List
- Sync Contacts from MailChimp List to Aritic PinPoint Segment
This integration leverages the REST API and the Mailchimp Plans that enable APIs are as follow:
- Growing Business Plan
- Pro Marketer Plan
REQUIREMENTS:
- Aritic PinPoint user account– For Mailchimp Integration first you need to login to Aritic PinPoint.
- Mailchimp user account– The second step is to have an existing Mailchimp account for integration.
Mailchimp and Aritic PinPoint integration
To automatically sync your contacts from Aritic PinPoint to MailChimp List and Sync MailChimp List Contacts to Aritic PinPoint Segment you first need to complete the MailChimp and Aritic PinPoint integration, you can follow these 2 steps to complete this:
STEP 1: Authenticate the Mailchimp plugin:
- Login to your MailChimp Account.
- Mailchimp username – we need username i.e email address for login to Mailchimp.
- Mailchimp access key- MailChimp account→ Go to Account → Extras→ API keys.

4. Create a new Key → Copy the created API Key.

STEP 2: Configure the Aritic PinPoint-Mailchimp plugin:
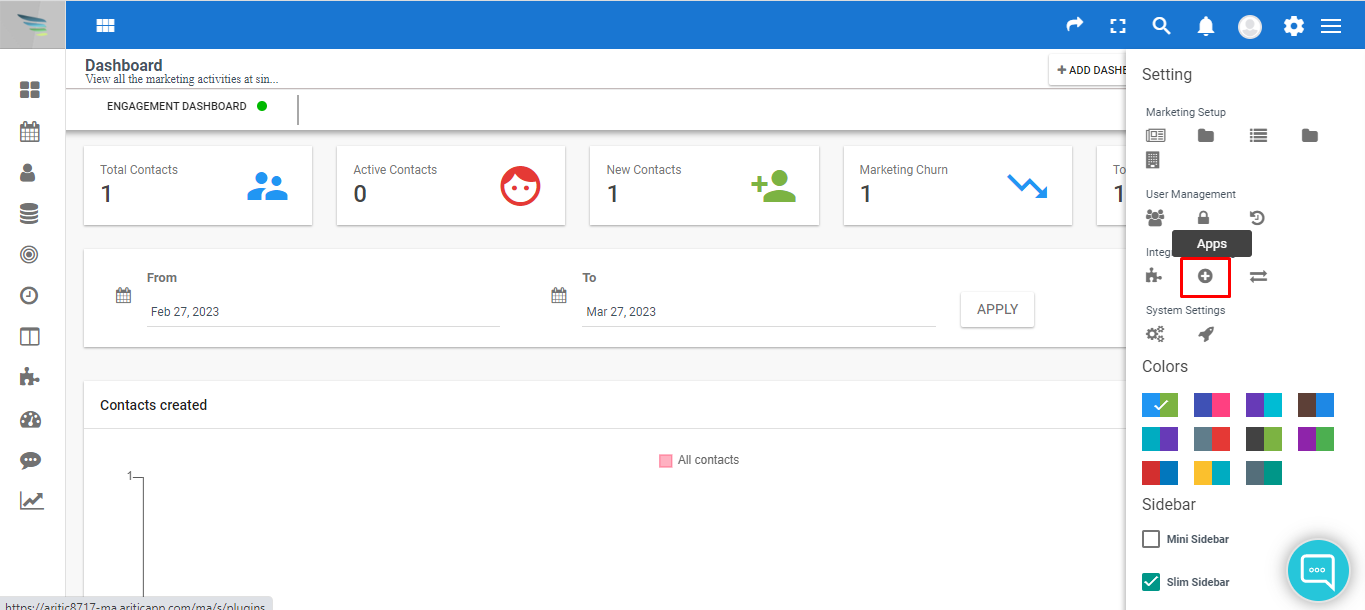
Go to Aritic Dashboard > Settings.
1. Click on settings.
2.Click on “App”
3. On the App page, click on “MailChimp” icon.

4. Now under the ENABLED/AUTH tab, kindly enter your MailChimp’s Username and API Key. You also have an option to either publish or unpublish it, select to Published. Click on Apply button to apply the changes.
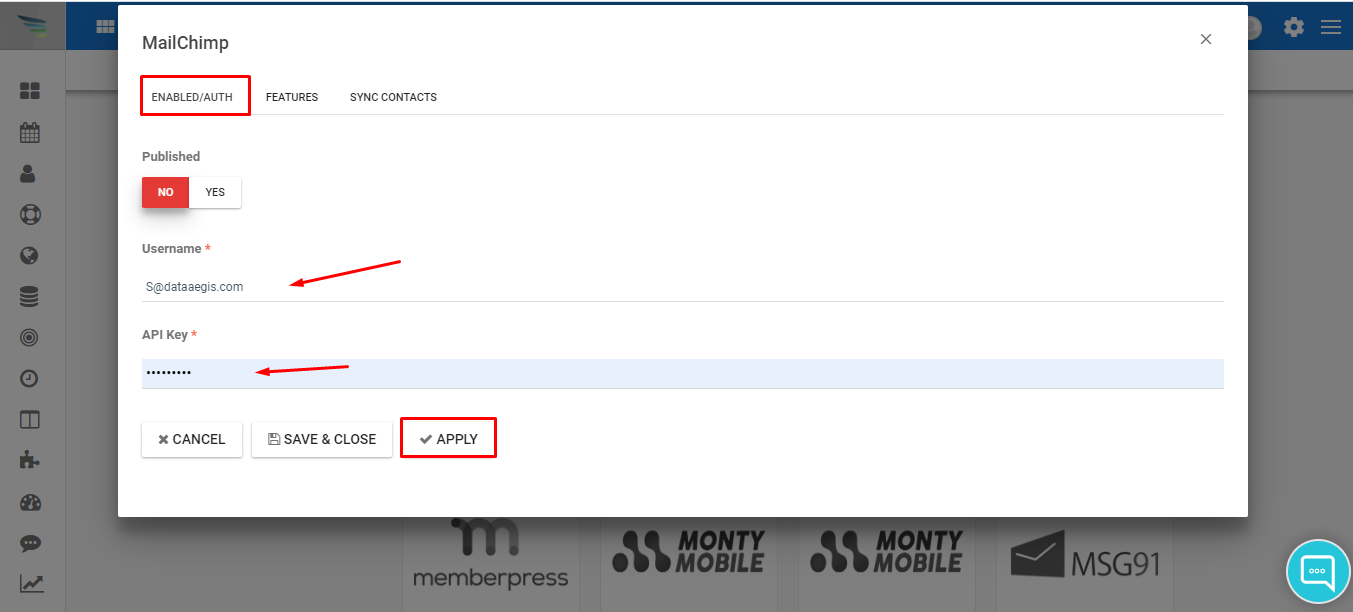
5. This will take you through the authentication process and complete the authentication.
Sync Contacts from a Aritic PinPoint to MailChimp List
Aritic PinPoint has this sync feature available to sync selected contacts from Aritic PinPoint to a MailChimp List.
Using this integration sync, you can automate the sync on selected contacts from Aritic PinPoint Automation Campaign workflow to your MailChimp account List.
1. Under the same Mailchimp Plugin Pop-up, navigate to Features tab and under Enabled features.
2. Select “Triggered action push contacts to integration“; also select a desired Mailchimp List from the drop down menu from “Select a Mailchimp List to Push Contacts“, in this MailChimp List, contacts sent from Aritic PinPoint will appear.

3. On this pop-up, you can select Push Contacts related settings like, “Enable double opt in” and “Send welcome email” accordingly, and these setting will apply automatically on the contacts which is being sent to MailChimp list.
4. Click on Apply button to apply the changes and then click on Save & Close button to save all the information and go back to the previous screen.
This feature enables the ability to push contact from Automation Campaign “Action” to desired MailChimp List.
Sync Contacts from MailChimp List to Aritic PinPoint Segment
Aritic PinPoint has this sync feature available to sync/ pull selected MailChimp Lists to Aritic PinPoint Segments.
Important step: Prepare your custom fields in Aritic PinPoint, which is present as same in your MailChimp account. This is first step before starting to sync contacts from Mailchimp to Aritic PinPoint.
Moving a subscriber completely have a risk of losing that subscriber’s activity and other information. But this process will help you sync the list from Mailchimp to Aritic PinPoint without losing those information at the same time.
Step 1: Add Custom Fields inside Aritic PinPoint, follow these steps:
1. If you have set up any custom fields in Mailchimp, you will be required to add those same custom fields in Aritic PinPoint first.
Click on the lists name in Mailchimp to check for custom fields. Click on the “Settings” menu and then select the “list fields” and “Merge” tags. If you are thinking about the primary address, first and last name, company, then don’t worry as these details are already present in Aritic PinPoint.
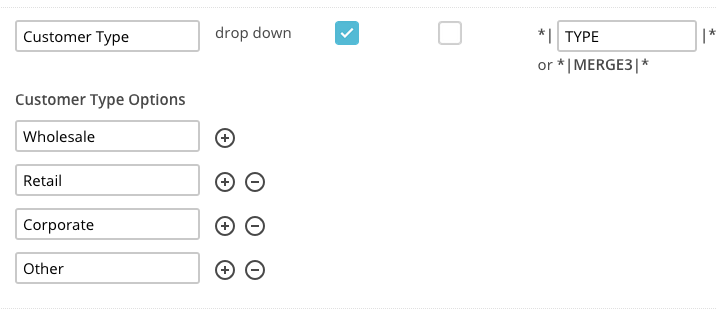
For instance, if you own a shop, then you may get an option to enter the kind of customer, the subscriber is- “write the type of examples” “include sc.”
2. Add (existing from MailChimp) Custom Fields to Aritic PinPoint
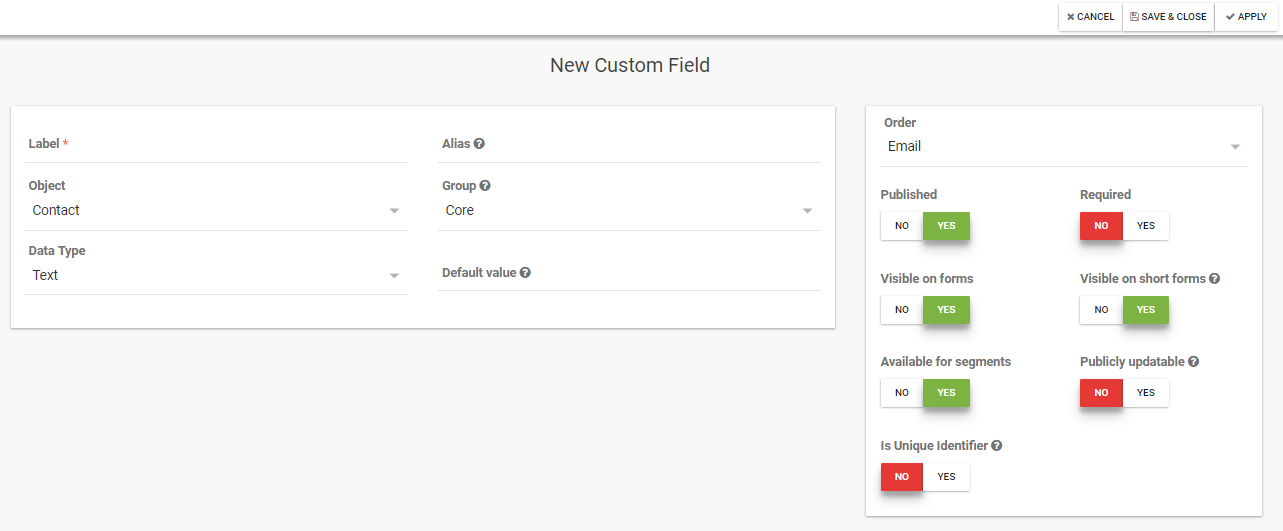
In order to add the custom fields, click on the settings icon in the top right and select “Custom Fields” from Marketing Setup tab. Now, you can view all the fields which are already set up in your Aritic PinPoint dashboard.
Select the “+New” button present in the top right to create your new custom field. As shown in this example, I’m creating a “Customer Type” as a “Select” field and set up the options so that to match my old custom field (similar to MailChimp).
You can follow this detailed guide too, about adding custom fields inside Aritic PinPoint.
Step 2: Using this integration sync, you can automate the sync on selected contacts from Aritic PinPoint Automation Campaign workflow to your MailChimp account List.
1. Under the same Mailchimp Plugin Pop-up inside Aritic PinPoint Plugin, navigate to Features tab and under Enabled features.
2. Select “Pull contacts and/ or companies from integration“; after that select “Contact” from the “Choose object to pull from“, followed by this select the MailChimp Lists which you want to import and sync inside Aritic PinPoint.
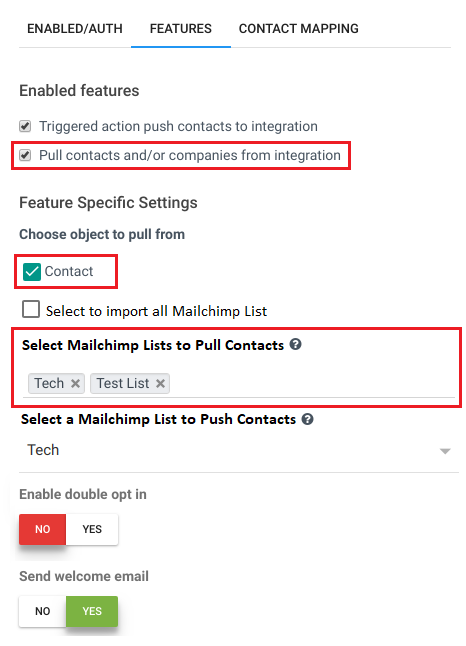
3. Click on Apply button to apply the changes and then click on Save & Close button to save all the information and go back to the previous screen.
This feature will import and sync the contacts from MailChimp respective lists to Aritic PinPoint segments. It will also create new segments inside Aritic PinPoint, if the segments are already not present. This segment will be Static Segment.
Note: You can also import all contacts from MailChimp to Aritic PinPoint manually, to do this you can follow this guide.
