Get Started with Estimates inside Aritic Sales CRM
Estimates
The Estimates allow you to make and send an approximate outline of your Items or Freelancer Services to your customers for approval before starting to work on it. The customer can then Accept the Estimate for approval before converting it into an Invoice automatically, or you can move ahead and convert it yourself to begin to collect the payment.
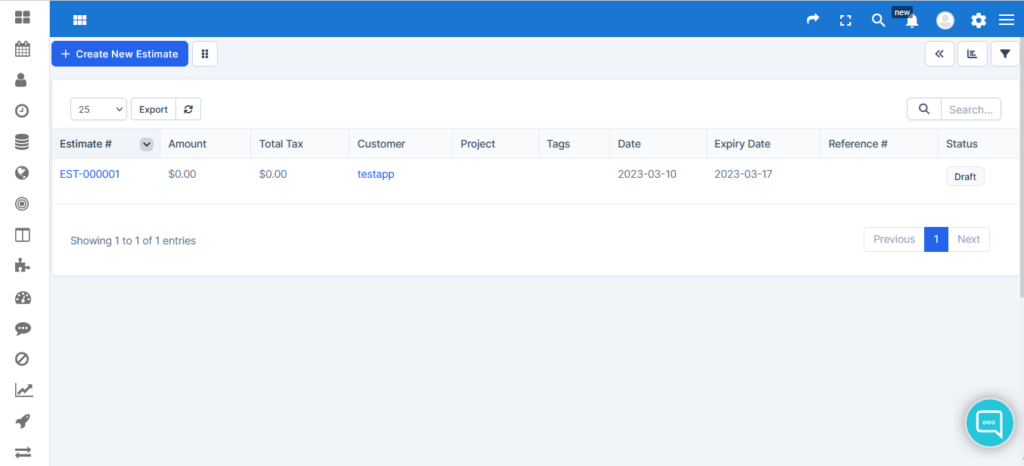
The Estimates List
As a freelancer, many jobs – either big or small – will start as an estimate. How does that mean? Well, a customer expresses interest in your products or skills but wants to know how much it will cost, in advance. With the estimates feature of Aritic Sales CRM, you can create a price estimate, and send it to the client upfront, help them to make the decision and to commit. It also enables you to keep a record of your income and projected work schedule.
Aritic Sales CRM enables you to create an invoice once the client agrees on the price quotation. To import all the estimate data automatically, you can organize, trace, and link your estimates and invoices.
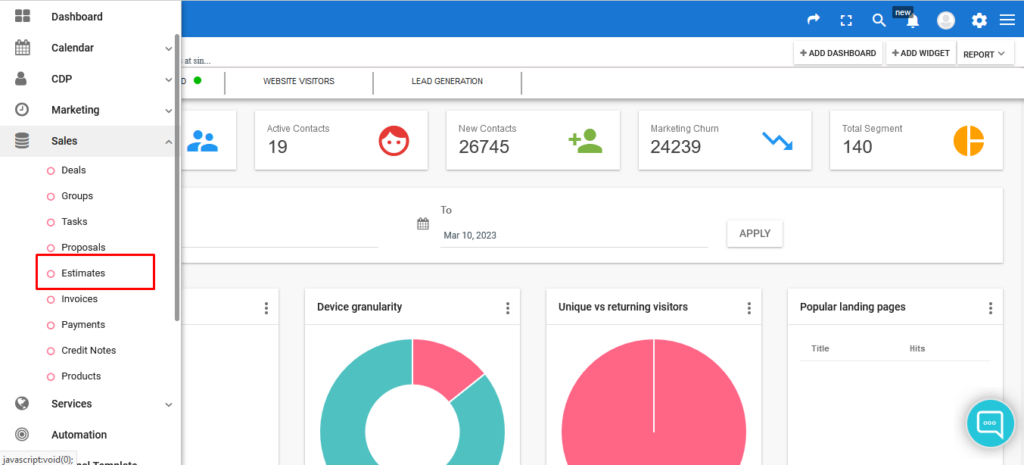
Click on the Accounting tab in the primary sidebar to view your estimates list page, and choose Estimates from the drop-down menu. It will display the Estimates list page.
Go to the Left navigation -> Click on “Sales” -> Click on “Estimates“.

The Overview
Estimates list table contains the columns as under:
- Estimate: Number of the Estimate
- Customer: Name of the customer
- Status: Current status of the Estimate (Pending, Invoiced, Approved )
- Expiry Date: Last date that the Estimate is valid and the client accepts
- Amount: Total amount of the Estimate.

Create Estimate
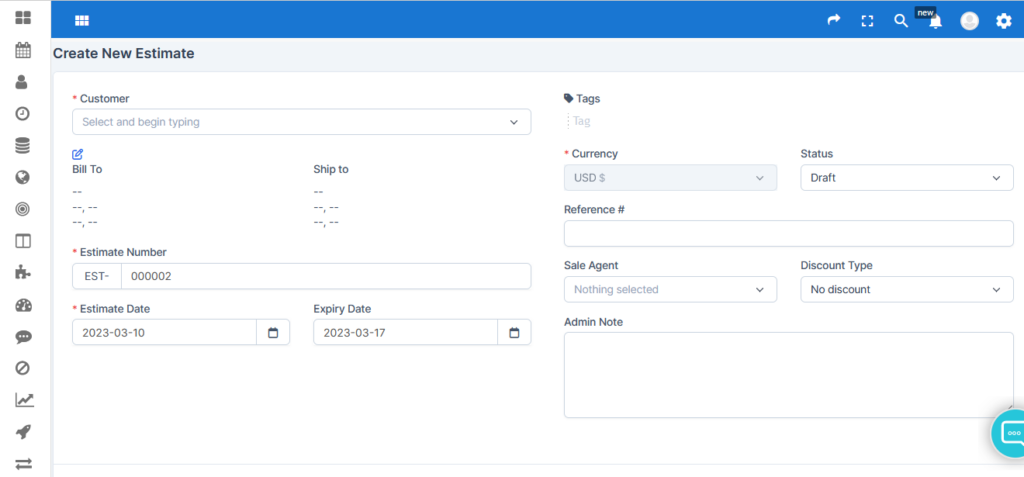
To create a new estimate, Click on the “Create New Estimate button. It will show the Create /Estimates page offering a series of numerical and text inputs.
The form contains:
- Customer: Choose the relevant customer from the client list.
- Estimate Number: Provides the Estimate Number.
- Estimate Date: Provides the Estimate Date.
- Expiry Date: Date when the Estimate expires.
- Currency: The Estimate currency.
- Tax 1: Tax 1 total in percentage.
- Tax 2: Tax 2 total in percentage.
- Tags: Enter the multiple tags for the estimates, e.g., logos, website, etc. (Optional)
- Notes: Want to fill in the information to appear as a footer on the Estimate? Enter it here. The text will show at the bottom of the estimates.

Once you have completed creating your Estimate, click on the Save Button.
The Estimate Page
- Show Estimate to client button: Use this button to show/hide Estimate to the client.
- Activity button: Click to see the Estimate history.
- Set Reminder button: Add a custom reminder to get alert. e.g., Reminder to send Estimate
- Notes button: Here, add estimate Notes.
- More button: Options include like Attach File, Mark as Sent, Mark as Expired etc.
- Send button: Email the Estimate directly via Aritic Sale CRM system to the email address specified for the customer.
- Mark as Accepted: Estimate status will change to accept.
- Mark as Declined: Estimate status will change to declined.
- Delete: Click on Delete button to delete the Estimate. It will eliminate and remove from the estimates list page
- Share button: Displays a link so that you can send to your customer to learn the Estimate.
- PDF button: Use this to download a PDF version of the Estimate
Convert to Invoice
Click on the Convert button to convert it to an Invoice, once the client accepts an estimate.

Email Estimate Preview
Click on the Send button when you want to send an estimate to the customer. A pop-up box will open before the estimate email is sent, and will display a preview of the email. You can add a new comment to the email here.
0 Comments