This article in depth describes how to set up integration between Salesforce and Aritic Pinpoint. The article is divided into two major parts:
- Plugin Integration of Aritic PinPoint and Salesforce
- Use case of Aritic PinPoint and Salesforce integrations.
This integration leverages the REST API and the only Salesforce editions that enable APIs are:
- Enterprise Edition
- Unlimited Edition
- Developer Edition
- Performance Edition
If your account does not fall in the above category, or you want our integration team to help, then you should feel free to contact Aritic Pinpoint integration support or your Salesforce rep, they will guide you and help you learn about the new update.
However, if you do own an account in the above category then, the following steps will help you to enable the plugin:
Step 1: Acquire the Client credentials of Salesforce
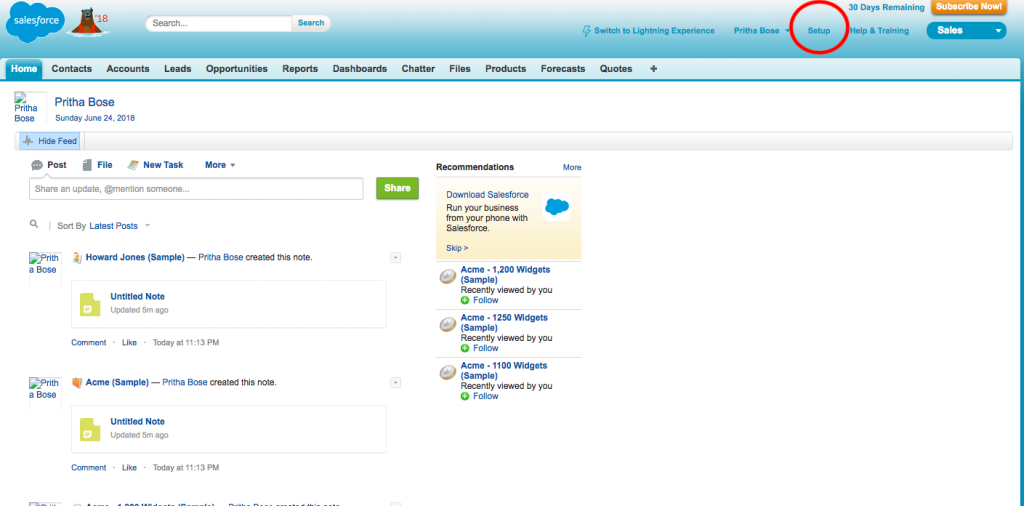
1. Go to: Setup (top right corner) / Build (bottom left corner) [lore_alert_message type=”info”]
Here we have shown it over the Classic version of Salesforce, which you can always access by choosing to view the dashboard in Classic version.
[/lore_alert_message]
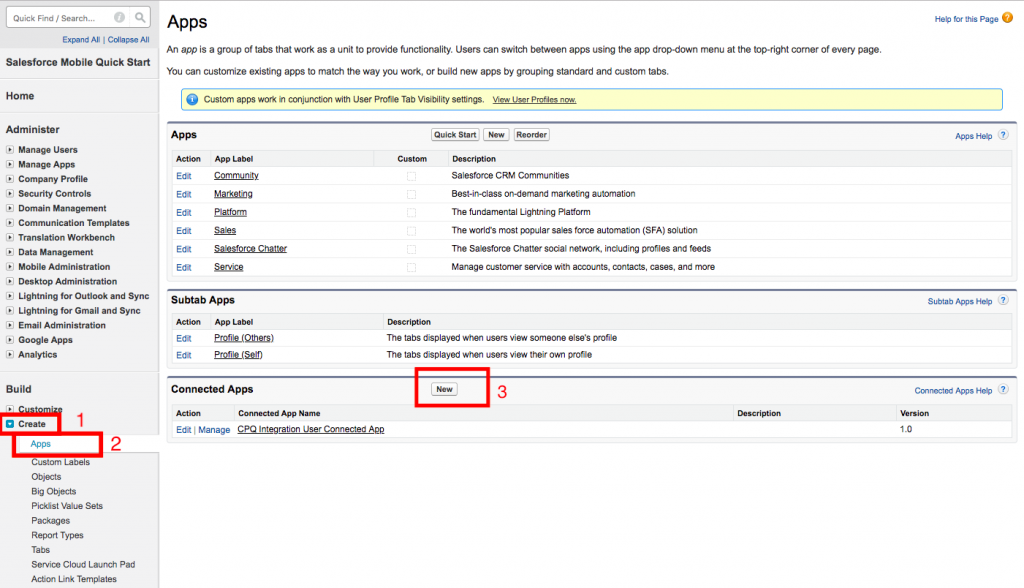
2. Click on Create > Apps >Connected Apps >New [marked as 1,2,3 as per the order of clicking].
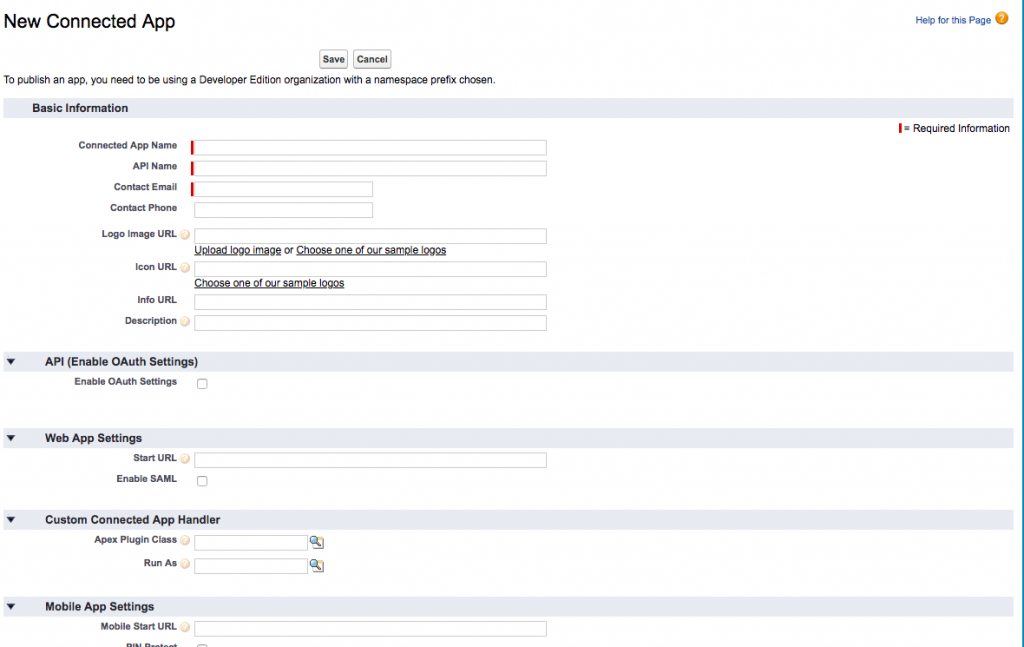
3. Make sure the Selected OAuth Scopes can:
- Access and manage your data (API)
- Perform requests on behalf of you at any time (refresh_token, offline_access).
Click on Save once you are done.
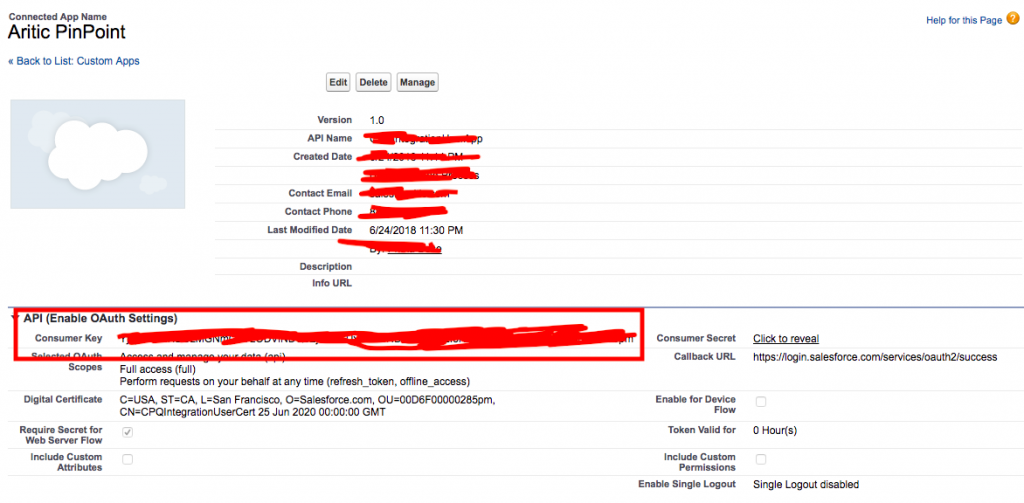
4. You will see the following page with all your saved details. From here, copy the Consumer Key and the Consumer Secret.
Now, open a new tab and login into your Aritic PinPoint account.
Configure the Aritic PinPoint Salesforce plugin
1. From your Aritic PinPoint dashboard, Click on the Plugins from top-right Settings as shown below.

2. Select CRM option to view all the CRMs available for integration. Select Salesforce CRM from the list.

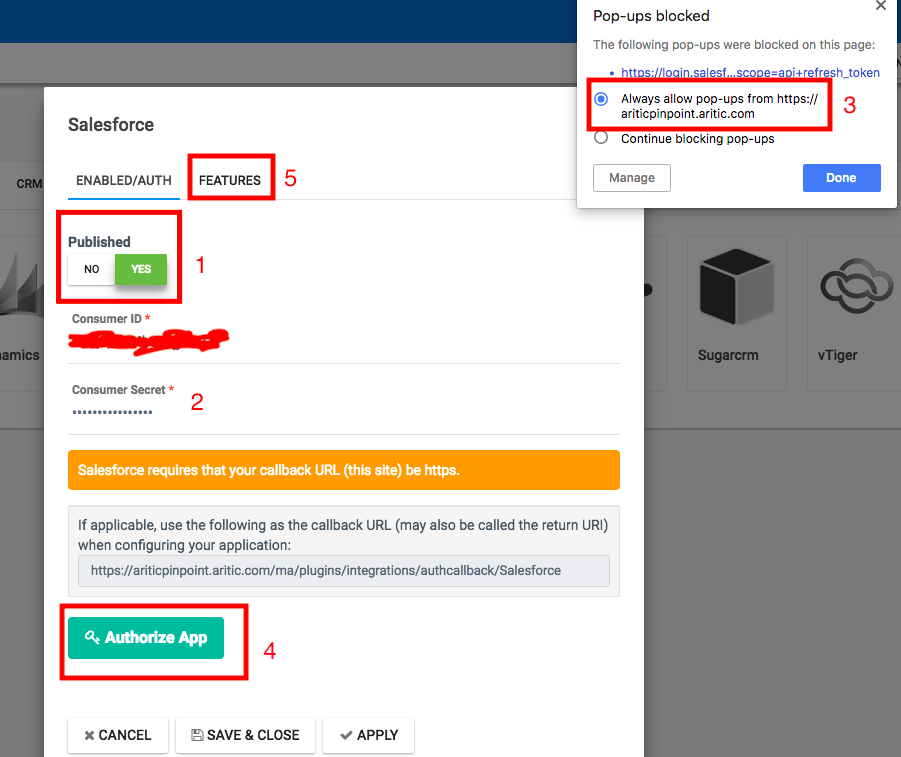
3. You will see the following dialog box. Change the published status to Yes. Proceed with entering the Consumer ID and secret code that you generated via your Salesforce account. Make sure to enable pop-ups to proceed further.
Click on Authorize app to get started. Next, click on Features tab to configure and map all contact fields. [lore_alert_message type=”info”]
Follow the order mentioned in the image below to integrate Salesforce smoothly.
[/lore_alert_message]
4. Make appropriate selections in the Features tab and click on save and close option.
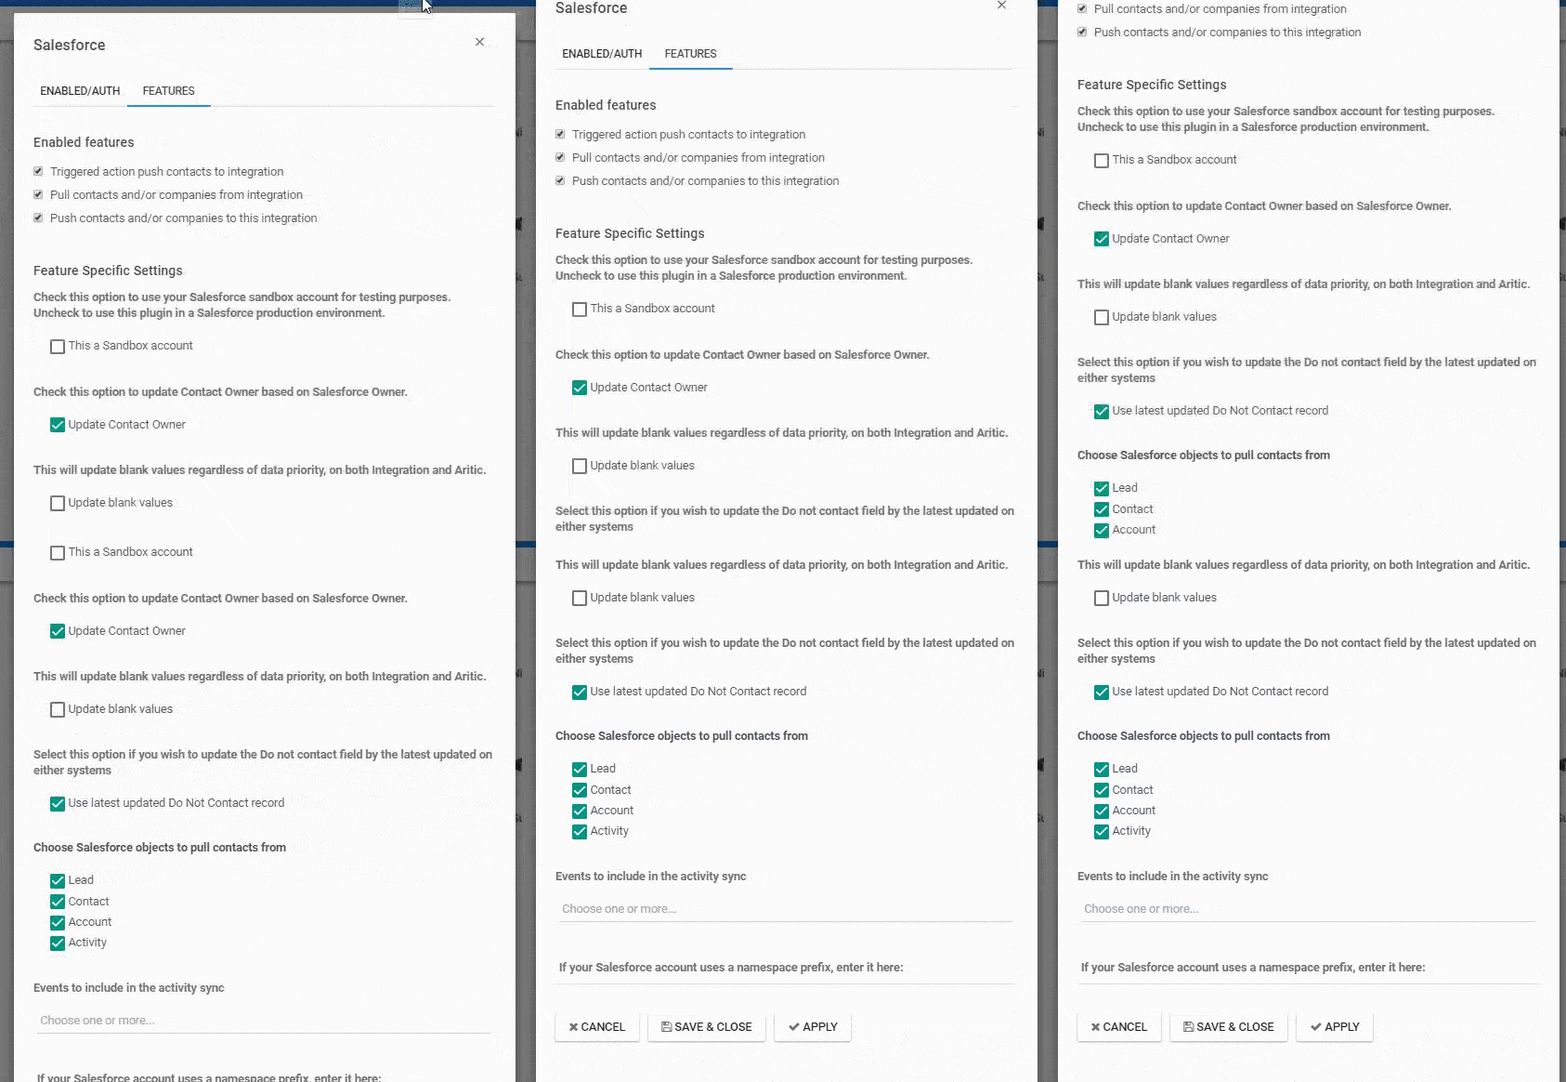
Features Tab within the plugin
- You can pull leads/push leads / contacts to and from this integration.
- Only through a form of a campaign can the “Triggered action push to integration” is done.
- Via API one can “Pull leads”.
- Through an API sync, one can “Push contacts to this integration,” every 8-10 minutes it occurs.
- Feature specific settings: Select the objects you want to pull/push records from. You can push contacts to the Leads object in Salesforce. You can also push activities (contact’s timeline records) to a custom object in Salesforce.
- Pulling records will be done from Leads and/or Contacts objects in Salesforce.
Setting up Aritic PinPoint’s Activities inside Salesforce
If one wants to push Aritic PinPoint activities into Salesforce then two options are available with the Salesforce integration. The first option requires one to pass the activities into a custom object, in this way activities are reportable. The second option requires one to set up a custom URL field in the Salesforce after which Aritic Pinpoint will insert a contact’s timeline link. Due to these associated activities and their timestamps, that will be available to you :
- Emails Read
- Contact Points
- Form Submits
Following are the two available options:
Option 1: Make activities reportable – you first need to set up a custom object in your Salesforce instance. Please set up the object as per the description is given below.
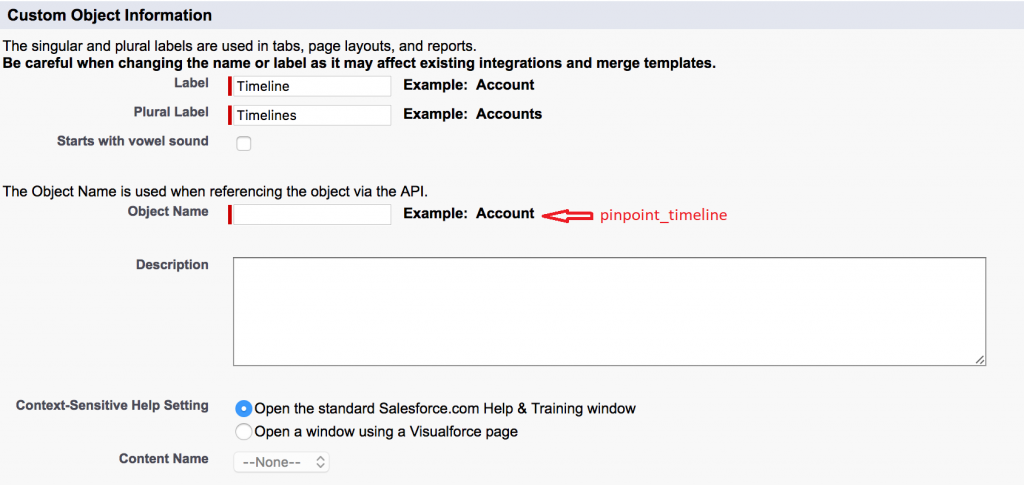
Step no. 1: On the initial screen of creating a custom object, make sure the Label field is populated with the value “Timeline” and the Object Name is “Pinpoint_timeline”. This will lead a few fields to auto-populate and then you are given the option to populate other fields which aren’t pre-populated by values that can relate to this object or your business. These extra fields do not have an impact on the activities.
Step no. 2: Once you save this initial screen, you will be exported to the custom objects screen where you have the liberty to set up the custom fields. Create the 7 custom fields that match the below format exactly:
- ActivityDate: Date/Time
- contact_id : Lookup(Contact)
- Description: Long Text Area(131072)
- WhoId: Lookup(Lead)
- PinpointLead: Number(18, 0) (External ID)
- Pinpoint_url: URL(255)
- ReferenceId: Text(255)
- This needs to be set up as a unique – select “do not allow duplicate values” in Salesforce
[lore_alert_message type=”info”]
API names for these will be auto-populated
[/lore_alert_message]
Step 3: After saving the custom object, if your Namespace Prefix is blank or missing, then leave it as it is. If the Namespace Prefix field shows up with a value auto-populated then you will need to add yours here.
Step 4: On the Aritic Pinpoint side, make sure ‘Activity’ is checked in the Features tab of the Salesforce plugin.
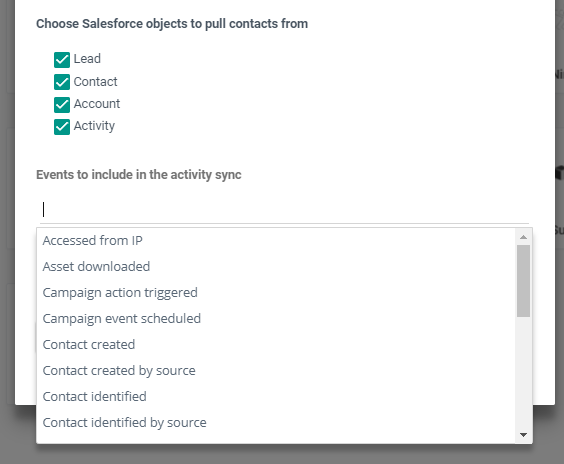
Step 5: Unpublish your plugin then re-publish. Save and close.
[lore_alert_message type=”info”]
Once you re-publish the plugin, Aritic Pinpoint will look at all of your contacts from the last 7 days then update those corresponding contacts or leads in Salesforce with the correct activities. The activity sync API takes about 8-10 minutes to push activities over from Aritic Pinpoint to Salesforce.
[/lore_alert_message]
Option 2: Contact’s timeline link – One needs to create a custom URL field within Salesforce. The “Contact Mapping” tab on the Aritic Pinpoint plugin page, allows one to search for the most recently created URL field in the list of Salesforce fields. Then proceed to map this field to the Aritic Pinpoint, “Contact’s timeline link” field. After which a link will display in Salesforce, this link when clicked on will display an iframe of all activities which are related to the contact. This is the same view that you have within Aritic Pinpoint’s timeline history on individual contact records. Note that these items will not be reportable within Salesforce.

One needs to choose the arrow that points from Aritic Pinpoint to Salesforce since you need to determine the direction of the update without mapping.
The contacts need to sign up as users in case your sales reps to press the link and to be able to see the contact’s history.
Test the plugin integration
To make sure that the configuration was successful, you are given 3 options how to do that. A contact can be pushed to integration via these places:
- The Campaign Builder has the Push contact to integration action which can be used in the Campaign drip-flow.
- The Standalone Form has the Push contact to integration action which can be used after a standalone form is submitted.
- The Point / Score Trigger has the Push contact to integration action which can be triggered when a contact achieves some point limit.
Use any of those triggers to test the plugin and see if the contact appears in the integration.
Use Case of Aritic PinPoint and Salesforce inside Campaigns
To communicate and keep the contacts in sync at both the systems, Aritic PinPoint communicates through automation campaign workflow (actions), forms and segments.
You can find Salesforce integration active at these 3 places inside Aritic PinPoint; which gives fair number of choices.
Inside Aritic PinPoint Automation Campaign:
Push to Salesforce Integration option can be found inside Automation Campaign feature of Aritic PinPoint. After the plugin integration is successful.
You can find this option under action tab of the workflow campaign builder in Aritic PinPoint.
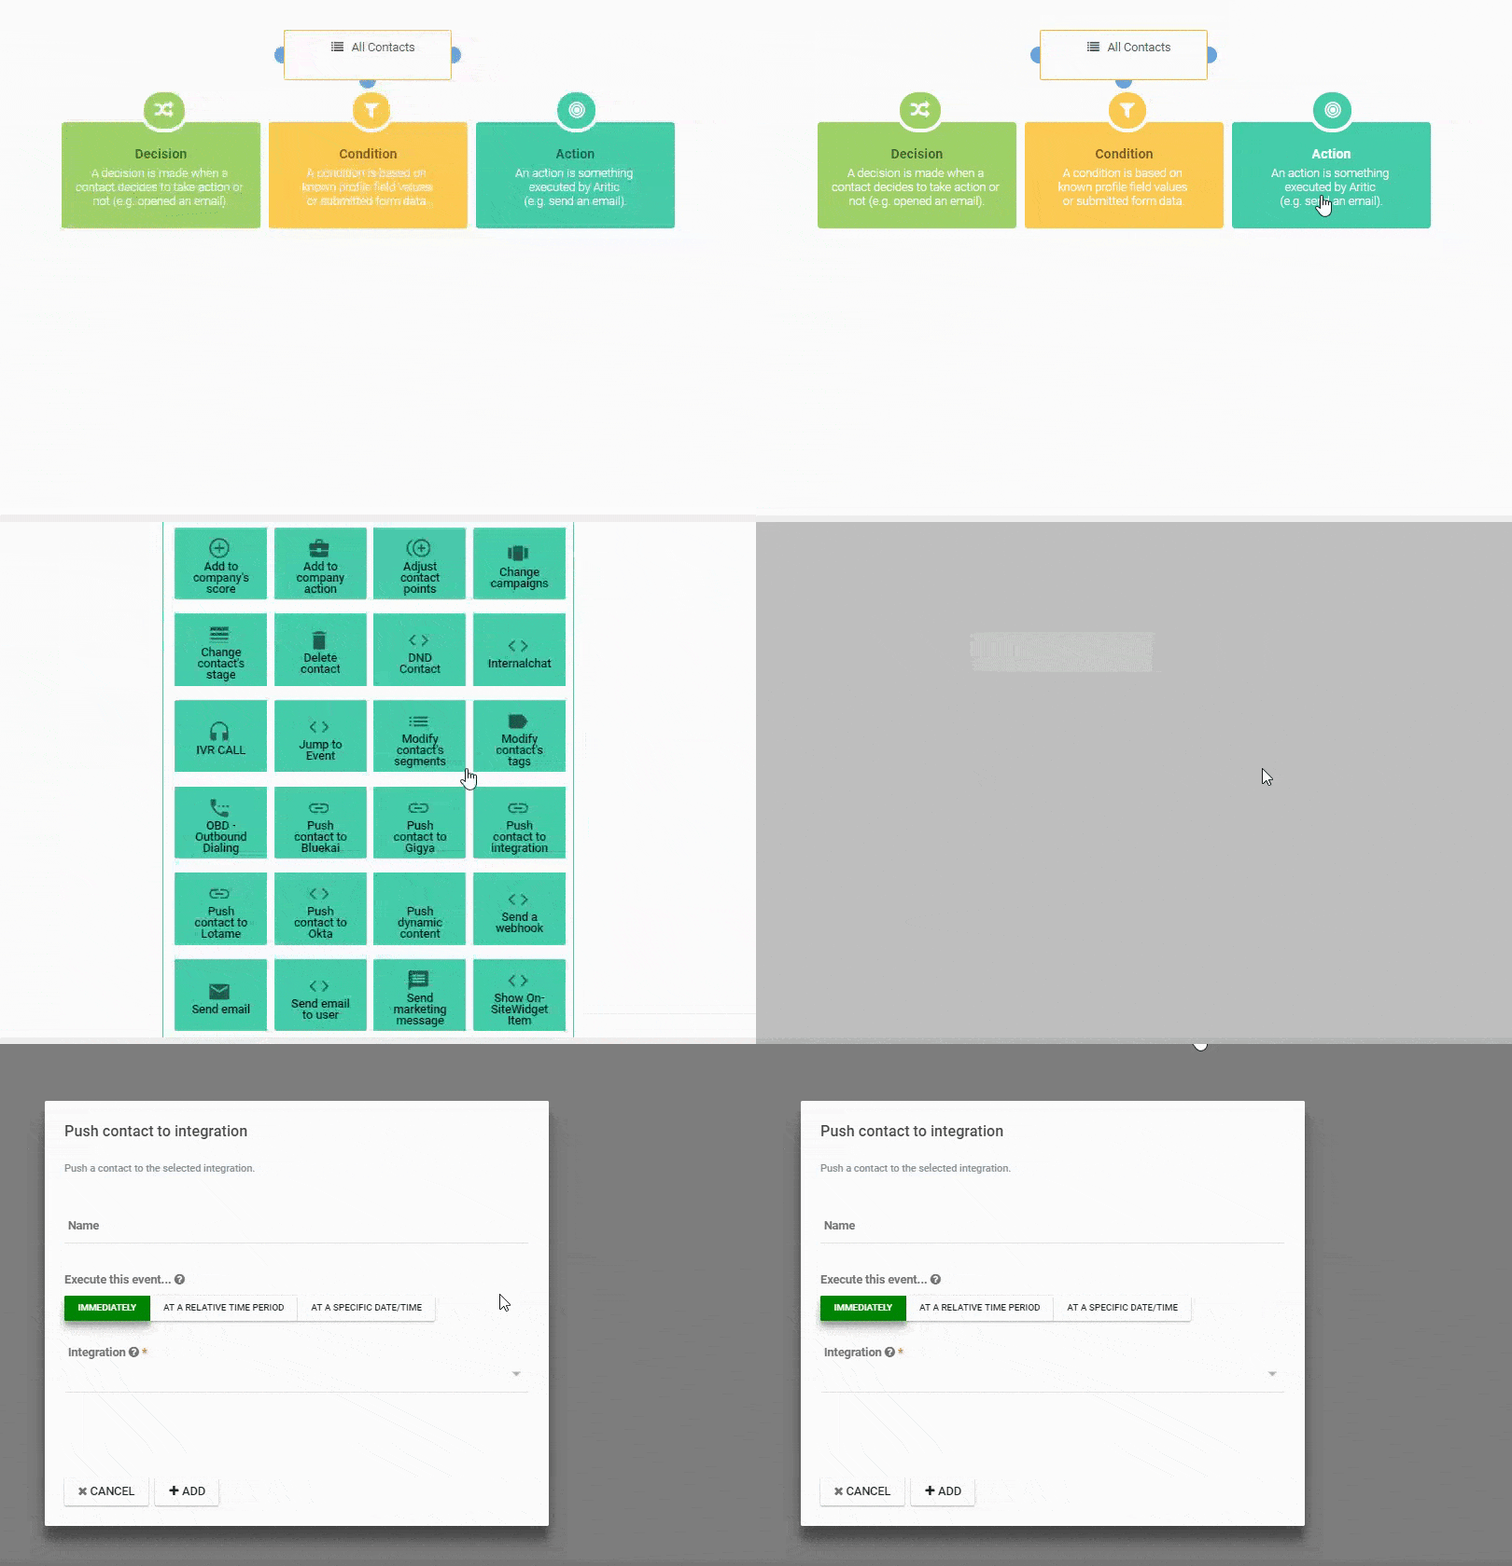
You can select the Event execution time.
Then, select Salesforce CRM from “Integrations“:
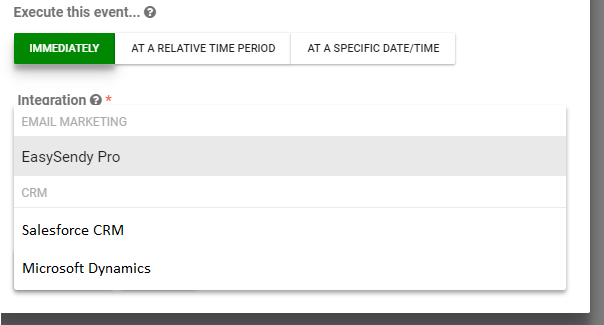
Select “Push contacts to this integration campaign”, from drop down select the Salesforce campaign.
After that you can set the “Campaign member status” from drop down and finally hit the Update button to save all action steps.

Above action can be added multiple times inside an Automation Campaign workflow, as and when required.
Further, this same option can be found inside Aritic PinPoint, Form Action > push to salesforce integration.
Inside Aritic PinPoint Contact Segments:
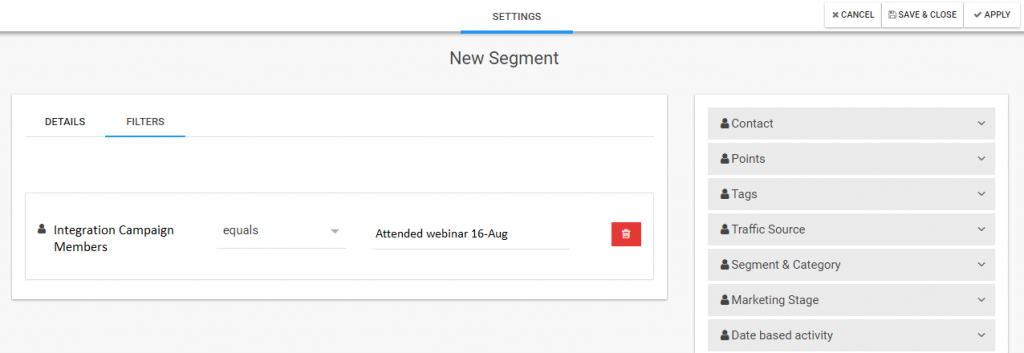
Selesforce integration filters can be found inside the Contact Segment Filters tab. There you need to select “Integration Campaign Member” and followed by this select the conditions and filter properties accordingly.
Sync the Contact’s Salesforce Email Opt-out with Aritic PinPoint Do Not Contact
Step I: Update Salesforce Email Opt-out Settings
First you need to make sure the “Email Opt out” field is visible to edit and the field history tracking has been set for the Email Opt Out field inside your Salesforce account.
1. Inside Salesforce, under the Setup menu in panel, go to Build > Customize then do the following for each of Lead and Contact’s layouts.
Add the Email Opt-out field. Then, continue to the customize fields screen.

2. Select the email opt out field and edit the field level security options.

3. Check and view if the field is visible at all levels if its not select it and save.

4. Finally go to the Setup > Customize > Leads > Fields menu (also the Contacts fields menu) to Setup the Field history and set history tracking on the Email Opt Out fields.

Step II: Update Aritic PinPoint Settings
Inside Aritic PinPoint > Setting > Integration Settings > Plugins > CRM > Salesforce, under Features tab, select “Use latest updated Do Not Contact record” check-box and save the setting.
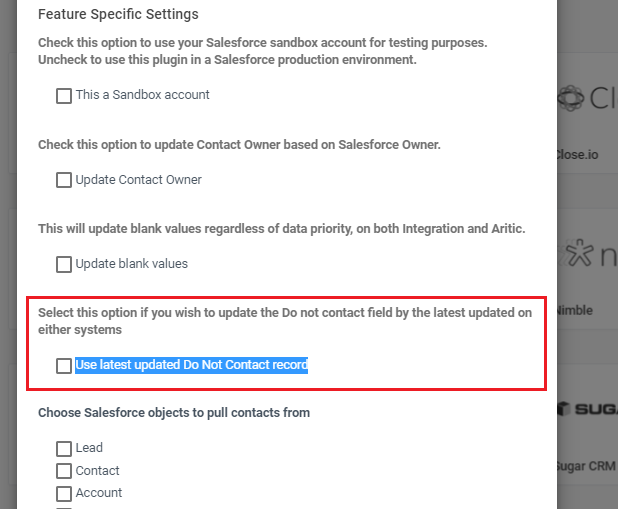
Map the Salesforce Email Opt Out field to Aritic PinPoint Do not contact by email field.
Now the do not contact status will get updated in both the system.
Recommendations and Best Practices
- Aritic Pinpoint doesn’t display the lead ID or Salesforce contact in the UI. One of the best practices is to make a custom field for the Salesforce ID within Aritic Pinpoint and map it to the Salesforce ID under “contact mapping” in the plugin. This enables one to build reports that include contacts with a Salesforce ID within Aritic Pinpoint.
- Put the plugin to test by only turning on the “Triggered action push contacts to integration” cause this allows you to test the mapping of your custom field safely with a select number of contacts only.
- In order to test, create a test segment and a test campaign with an action to “Push contacts to Integration”, so you can make sure the fields mapped appropriately.
- If setting up a Select list custom field in Aritic Pinpoint, we recommend matching the values in Aritic Pinpoint that you have in your Salesforce picklist. If you choose to not match the lists then Aritic Pinpoint can push values into Salesforce picklists only when the picklist custom field in Salesforce is set as unrestricted. Aritic Pinpoint’s select fields, by default, are unrestricted.
- Within the Features tab, in order to pull contacts in from “Activity”, you need to have a namespace prefix entered. This field is right below the Activity field on the Features tab.
- Salesforce requires values on certain fields being passed in, such as Last Name and Company Name. If Aritic Pinpoint has those fields set as blank then Aritic Pinpoint will push the value, “Unknown” into Salesforce. In case you have the “Pull contacts from integration” turned on to pull those fields into Aritic Pinpoint then Aritic Pinpoint will not populate those fields with Unknown. They will be left blank.
- If you use Salesforce campaigns, you can set up a segment to pull in members of a specific Salesforce campaign
- Create a new segment then use a filter for “Integration Campaign Members” then select the campaign you’d like to use.
Sync Aritic Events to Salesforce Tasks
There is two way of sync Aritic Events To Salesforce Task.
1. You can sync Aritic sales and marketing events with Salesforce tasks for interactions with your leads and contacts and your team’s productivity and this you can do with the help of Aritic Salesforce integration. The task may be emails, followup, notes, meetings, etc.
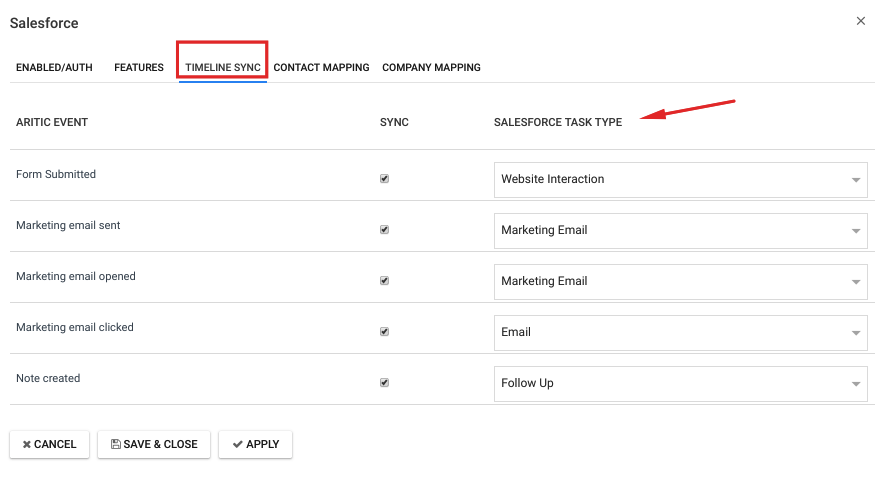
- You can sync Aritic marketing or sales activities to Salesforce as tasks. For example, a contact opening a marketing email can sync to Salesforce as a task.

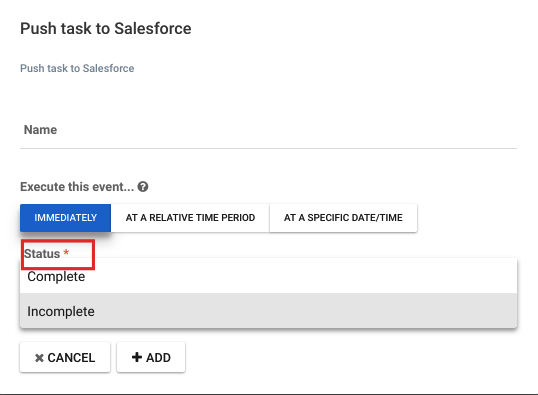
2. The second way is going in the Action button and then click push task to Salesforce.

- Now the task will be pushed to Salesforce, to execute the Event.
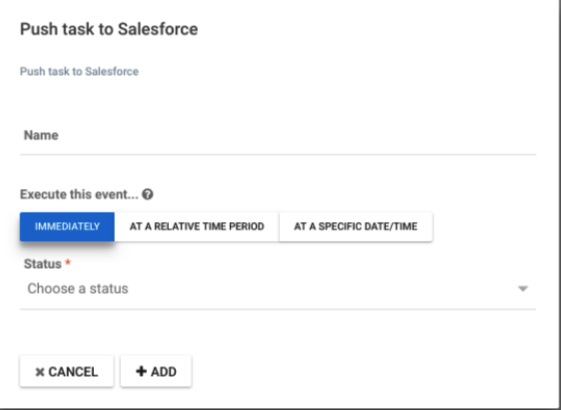
- At last, you can see that the task is complete or incomplete.
